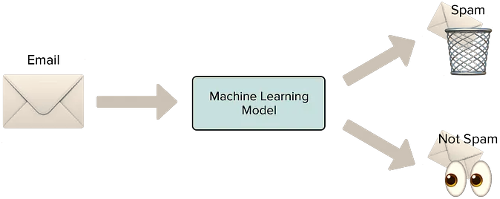
Classification Model
Reads input and generates output classifying the input into one or more distinct categories (or classes); e.g., the model might read an email and classify it as either 'spam' or 'not spam' in the case of a binary classification problem.Project Creation/Selection
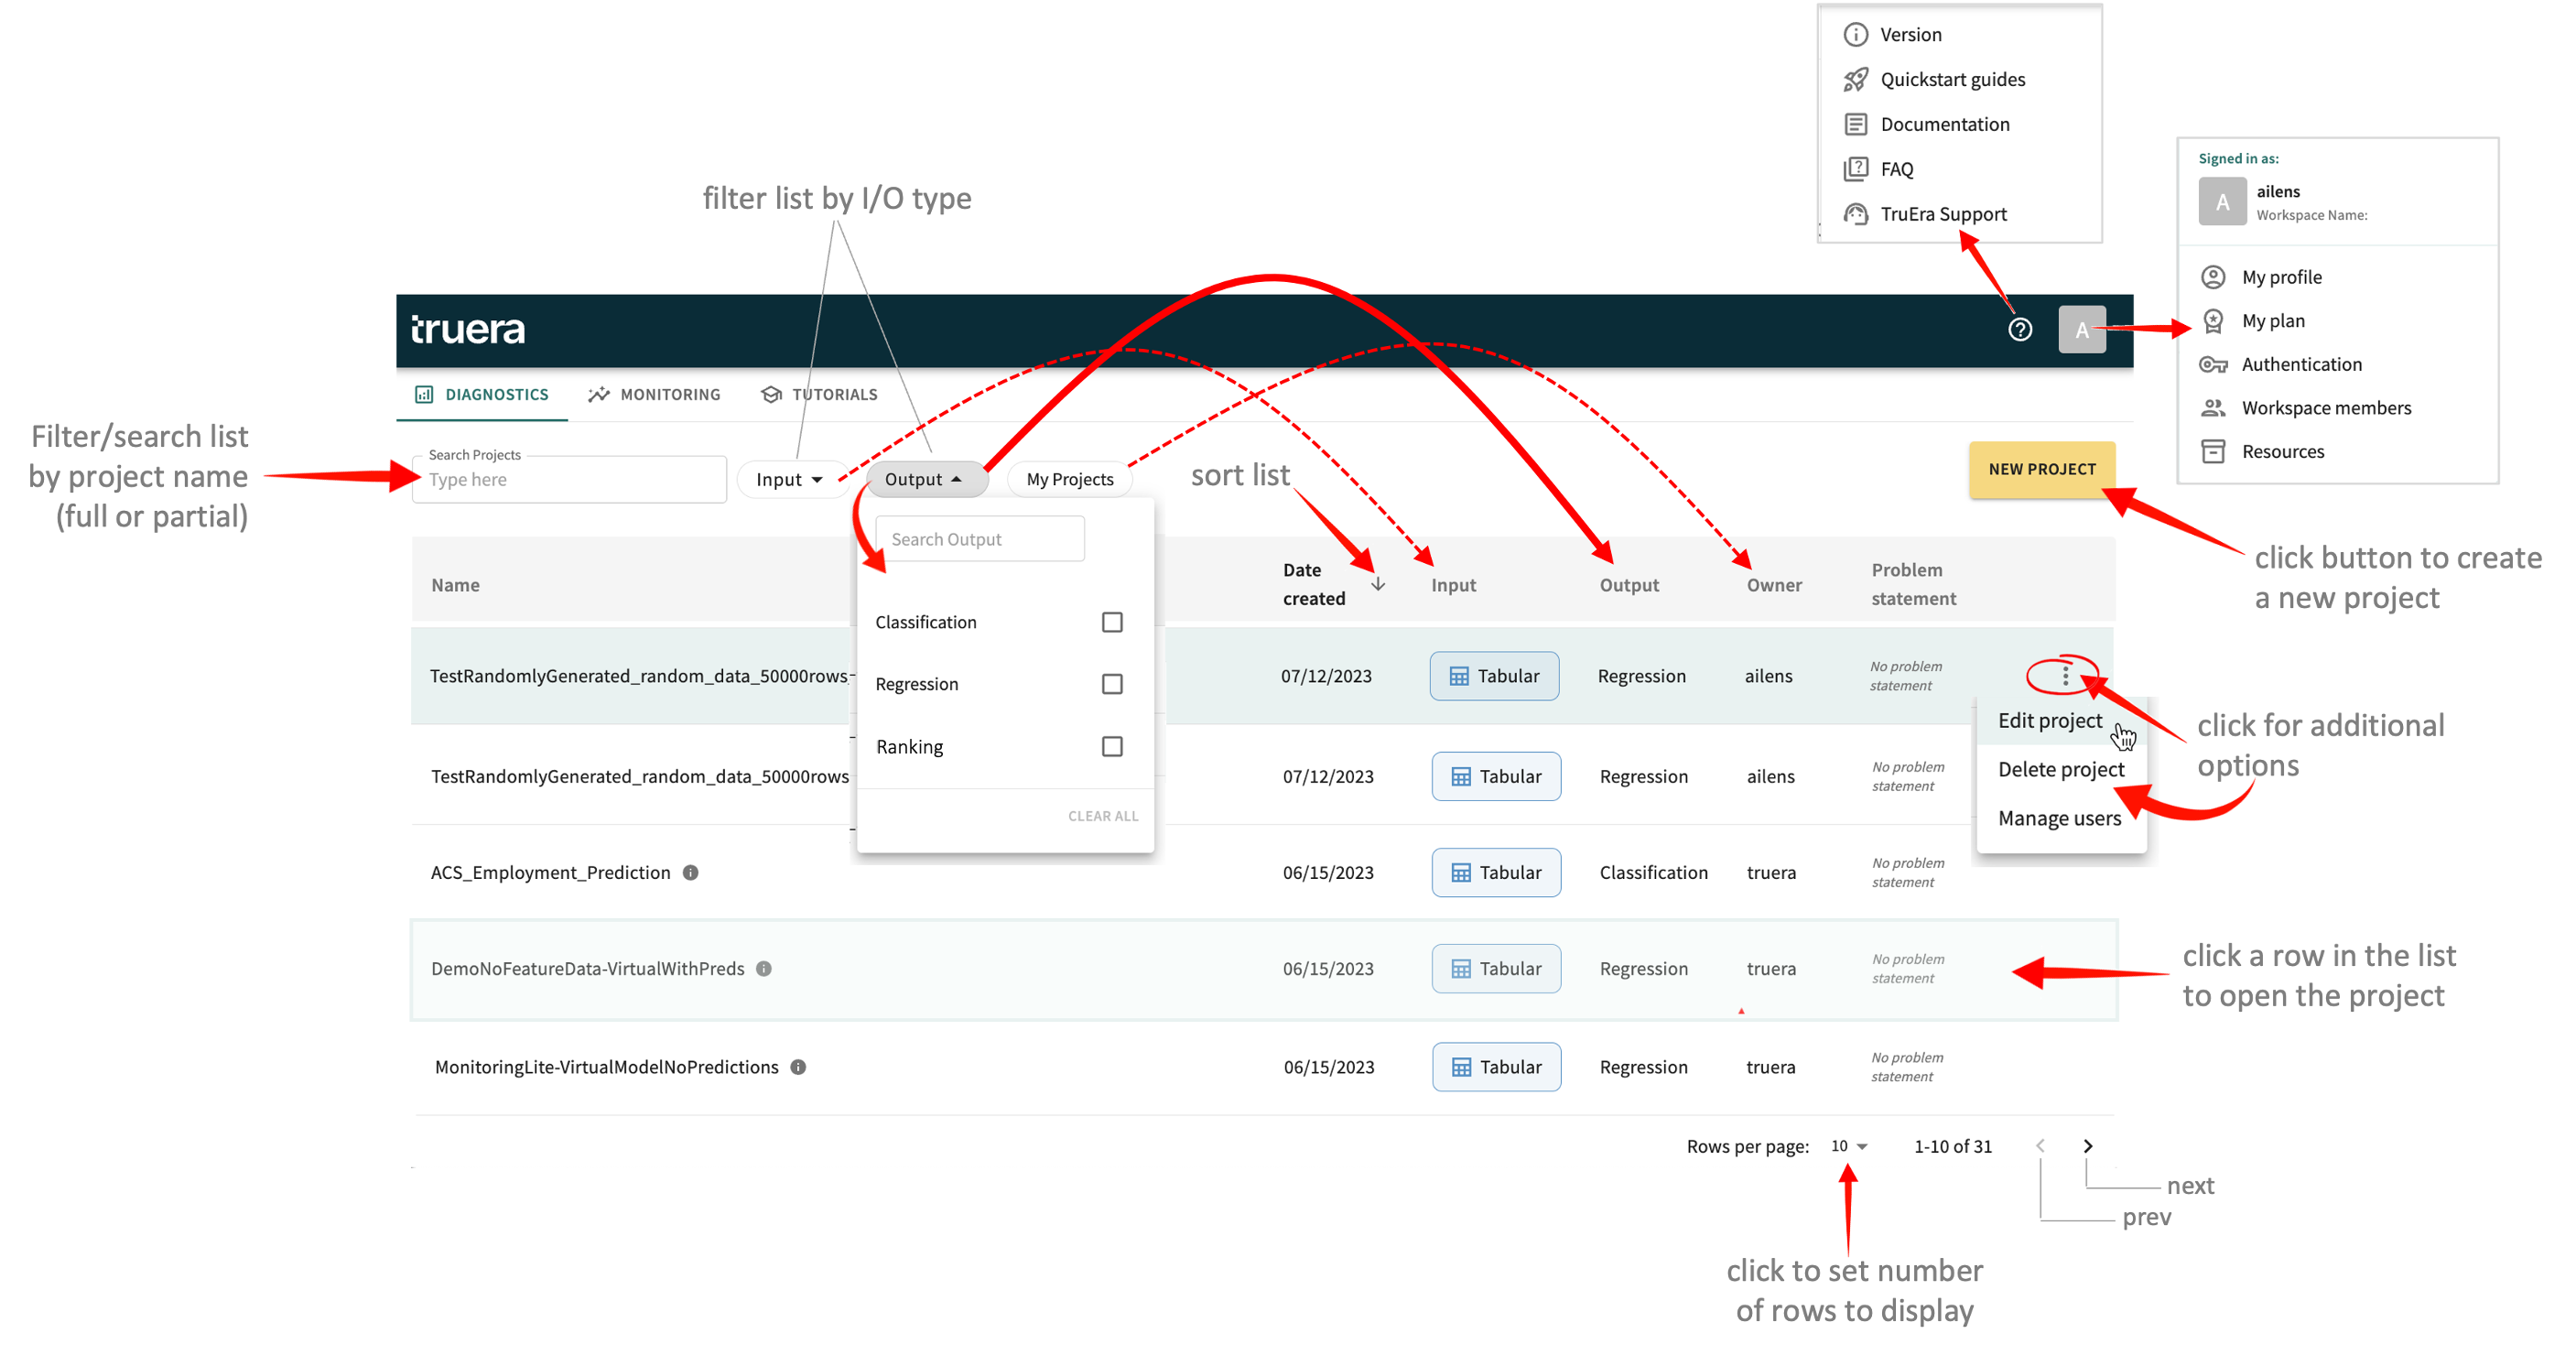
Each time you launch the Web App (including the first time) the Diagnostics tab opens by default to your projects list. From here, you can select an existing project to work on or create a new project. If you haven't yet created any projects, the list is empty. Click NEW PROJECT to create your first project or to add a new project to your project list.
Undertanding Output Types
Seen in the Output selection control above, each project has a specified model type — Classification, Regression, or Ranking. Click a link below for useful information about the respective type.
Creating a New Project
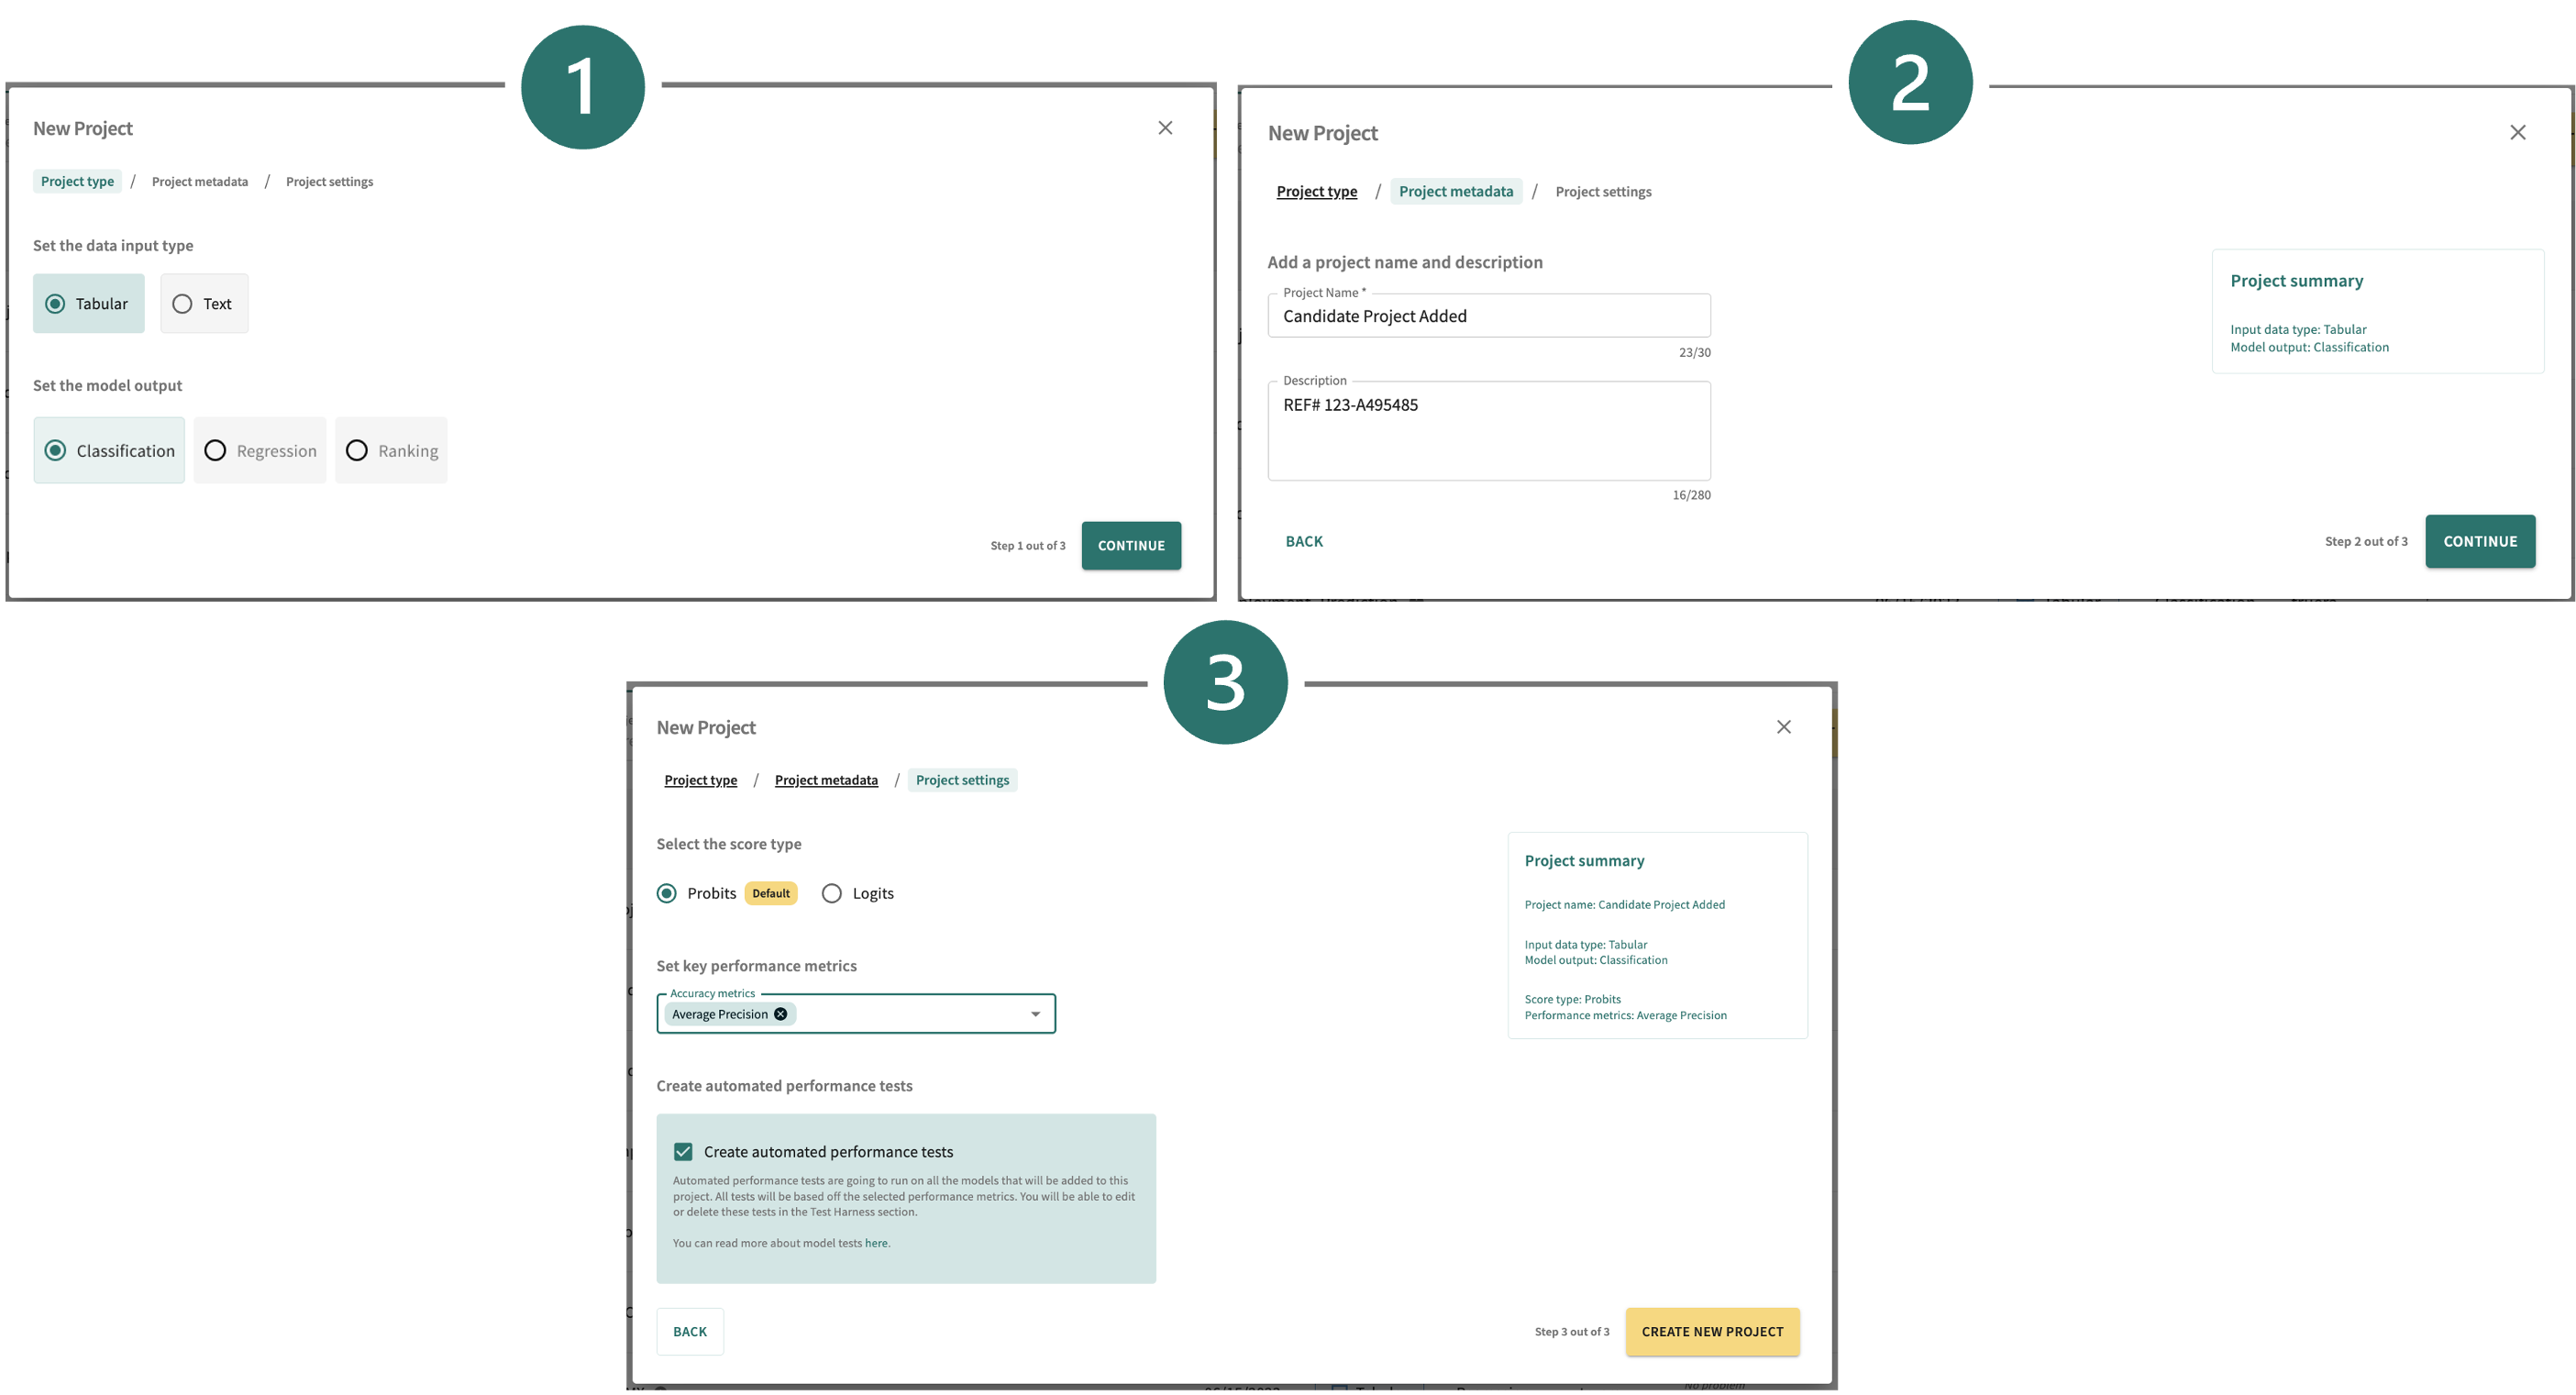
To create a new project, click NEW PROJECT in the upper right of the page, then:
- Make your project input and output selections:
- Set the data input type to either Tabular or Text.
- Set the model output type to Classification,Regression, or
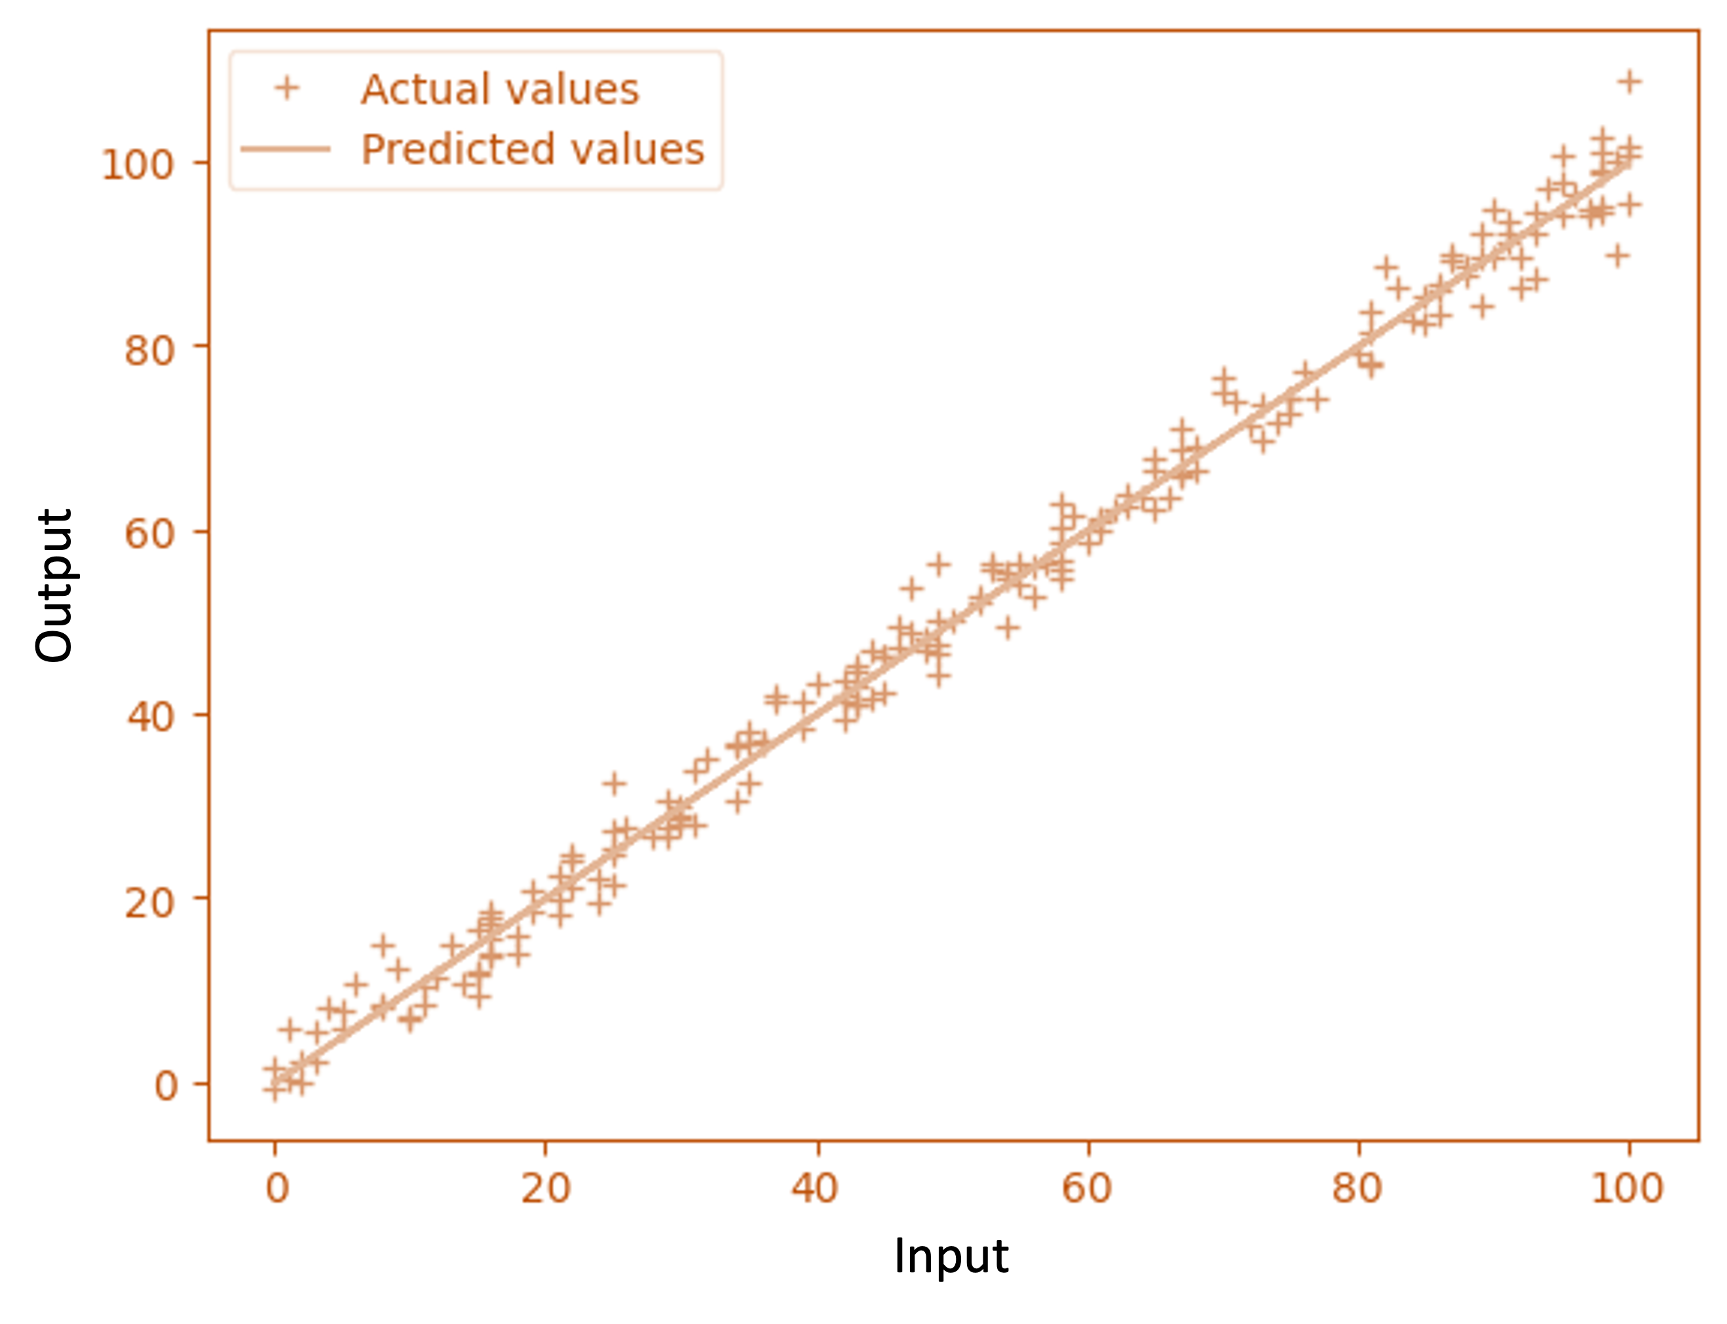
Regression Model
Estimates or describes the relationship between one or more independent variables and a response, dependent, or target variable; typically used when the dependent variable is quantitative, except in the case of logistic regression, where the dependent variable is binary.Ranking.Ranking Model
Takes a query as input along with other relevant information — e.g., a user’s browsing/shopping history — and assigns a score or rank to a group of items based on their relevancy to the input. The list of items can then be sorted by its scored relevance. - Click CONTINUE.
- Enter a Project Name (required) and Description (optional), then click CONTINUE.
- Configure your project settings:
- Select a Score Type appropriate for the model output you set in Step 1b.
- Probits (default) – determines the likelihood that an item or event will fall into one of a range of categories by estimating the probability that observation with specific features will belong to a particular category.
- Logits – predicts the probability of an event occurring in situations for which there are two possible outcomes.
- Regression – predicts a continuous output value based on input variables (features).
- Select one of the available Accuracy metrics (see Supported Metrics for definitions).
- Enable/disable Create automated performance tests (see Testing Your Model for additional details).
- Click CREATE NEW PROJECT.
- Select a Score Type appropriate for the model output you set in Step 1b.
The new project is added to your projects list. Click on its row to open its Project overview and add appropriate information about the purpose of the project.
Selecting a Project
As pictured above, your projects list can be filtered by the Name of the project and sorted by Date created or Owner. To select and open a project, click its row. To return to the Projects page, click Back to Projects at the top of the navigator on the left.
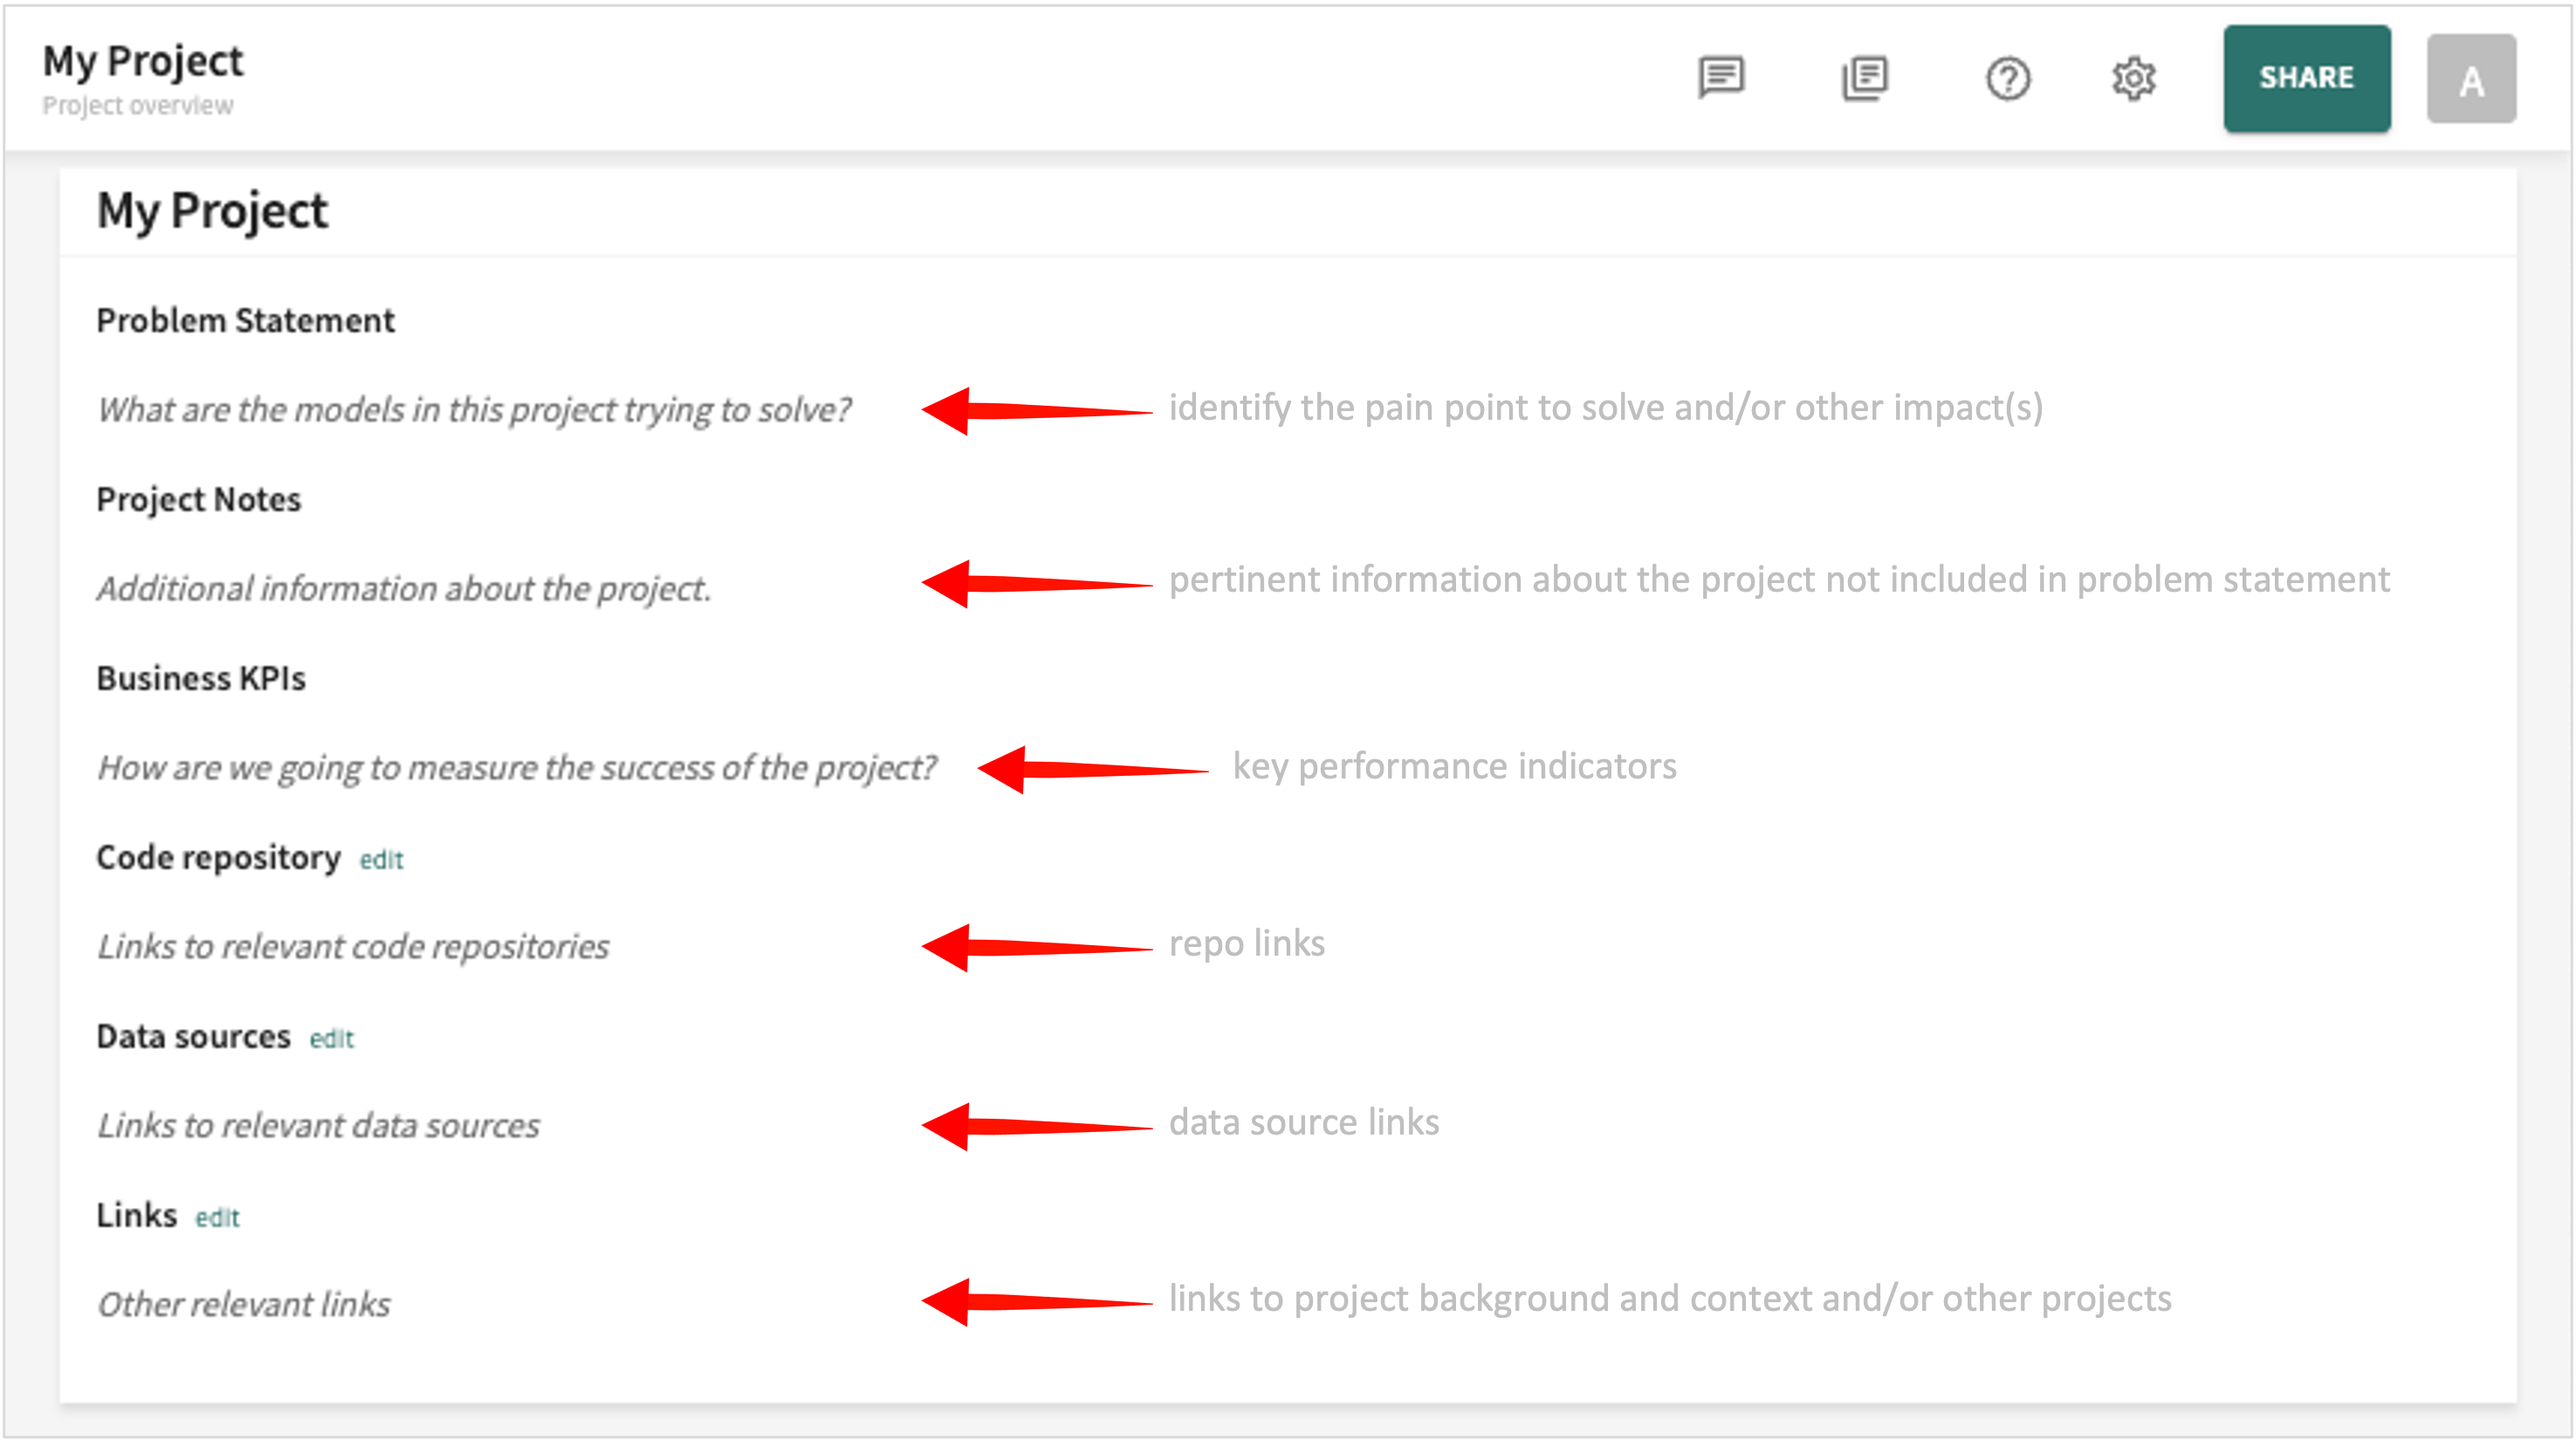
Defining a Project
The Project overview defines the project in terms of:
- a Problem Statement – identifies the pain point you hope to solve or the impact you hope to make with this project; should be clear, concise, and define a measurable outcome.
- Project Notes – available information about the project, such as how it came about and the intended use of the information its models generate.
- Business KPIs – lists the key performance indicators used to measure the success of the project over time pursuant to a specific objective; for example, targets for teams to shoot for, milestones to gauge progress, and insights that help make better decisions based on project results.
- Code repository – links to repositories containing the code that runs this project's model(s).
- Data sources – links to the data sources containing the data collections on which your model(s) will run.
- Links – any other relevant links you wish to include for background/context.
Click in the "content" area of an overview element to add/change its content. Click the corresponding Save button to record your additions and changes. You can come come back whenever you like to edit and refine the project overview as your project progresses and evolves.
As indicated in the Web App, Markdown is supported for rich text formatting.
To view the problem statement and and other information at any time within an open project, click Project overview in the Web App navigator on the left.
To return to your Projects list, click Back to Projects near the top of the Web App navigator on the left.
Click Next below to continue.
What is a Classification project? ✕
As the name suggests, models in a classification project categorize input (data) into different classes or groups.
Hence, classification predictive modeling is essentially a mapping function f from input variables x to discrete output variables y. A probability score is then generated and assigned to the input, categorizing the record as a member of a particular class defined for the model — spam or not spam, yes or no, disease or no disease, red or green, male or female, etc.
Among its many applications, classification models can categorize products, images, detect fraud and malware, classify documents, a medical condition, filter spam, recognize faces, fingerprints, and voices, and predict customer behavior.
Common classification algorithms include:
- binary – supporting just two possible outcomes; e.g., yes or no, true or false, spam or not spam, etc. Common binary classification algorithms include logistic regression,Input values x are combined linearly using weights or coefficient values to predict an output value y. A key difference from linear regression is that the output value being modeled is a binary value (0 or 1) rather than a numeric value.decision trees,Hierarchical, tree-like model of decisions and their possible consequences; recursively splits the data into subsets based on the most significant feature at each node of the tree.simple Bayes, andAssumes that the presence of a particular feature in a class is unrelated to the presence of any other feature to find the probability of A happening, given that B has occurred. Here, B is the evidence and A is the hypothesis.support vetor machines.Used for two-group classification problems; creates a line or a hyperplane that separates the data into classes.
- multi-class – supporting more than two outcomes absent the concept of normal and abnormal outcomes. Here each outcome is assigned to only one label. For example, classifying images, classifying species, and categorizing faces, among others. Some common multi-class algorithms are decision trees, progessive boosting,Sequential operation in which weak learners are built in a progressive, co-dependent series — weak learner m depends on the output of weak learner m-1. Note: The weak learners used in boosting have high bias and low variance.nearest k neighbors, andA non-parametric classifier using proximity to make classifications or predictions about the grouping of an individual data point; often referred to as KNN or k-NN.rough forest.Uses the concept of random forest and rough set theory in a single model by combining a collection of decision trees for classification instead of depending on a single decision tree.
- multi-label – supporting more than one class label assigned to the data. Here the model will have multiple outcomes. For example, a book or a movie can be categorized into multiple genres, or an image can have multiple objects. Some common multi-label algorithms are multi-label decision trees, multi-label gradient boosting, and multi-label random forests.
Classification models should be fully trained using training data and then evaluated on appropriate test data before being used to perform prediction on new, unseen data.
What is a Regression project? ✕
Regression models describe the relationship between one or more independent variables and a target variable; e.g., the relationship between a person's or a thing's height and weight. In fact, regression models are often at the heart of studies about fuel efficiency, the cause of pollution, or the effects of screen time on learning.
Common types of regression include:
- linear – these are models wherein the relationship between inputs and outputs is a straight line, typically the easiest pattern to conceptualize and observe. The general idea is the association between a predictor and a target and, more specifically, the relationship between the two. Model fit is described using a mean squared error — basically, a number showing exactly how well the linear model fits.
More serious examples of a linear regression include predicting a patient’s length of stay at a hospital, the relationship between income and crime, education and birth rate, sales and temperature, and so forth.
- non-linear – initially shows a positive relationship between number of inputs and the result. However, as the number of inputs increases, the model may flatten out and become almost constant. The important takeaway here is that it is important to understand when a model could potentially be non-linear. If you make assumptions based on a linear model, you could get results that are very different than expectations. By looking more than one input variable, a clearer picture may emerge concerning timing and frequency. Although conceptualizing the model becomes more complex with more inputs, the relationship may continue to be linear. For these models, it is important to understand exactly what effect each input has and how they combine to produce the final target variable results.
- stepwise – for models involving many potential inputs, the analysis may start with the most directly correlated input variable to build a model. The next step is to make the model more accurate, for which additional input variables can be added, one at a time, in order of significance for the results. Alternatively, the analysis may start with a larger set of input variables and then incrementally remove the least significant.
The variable being explained or predicted by the model is called the response variable or the dependent variable, because it depends on another variable.
What is a Ranking project? ✕
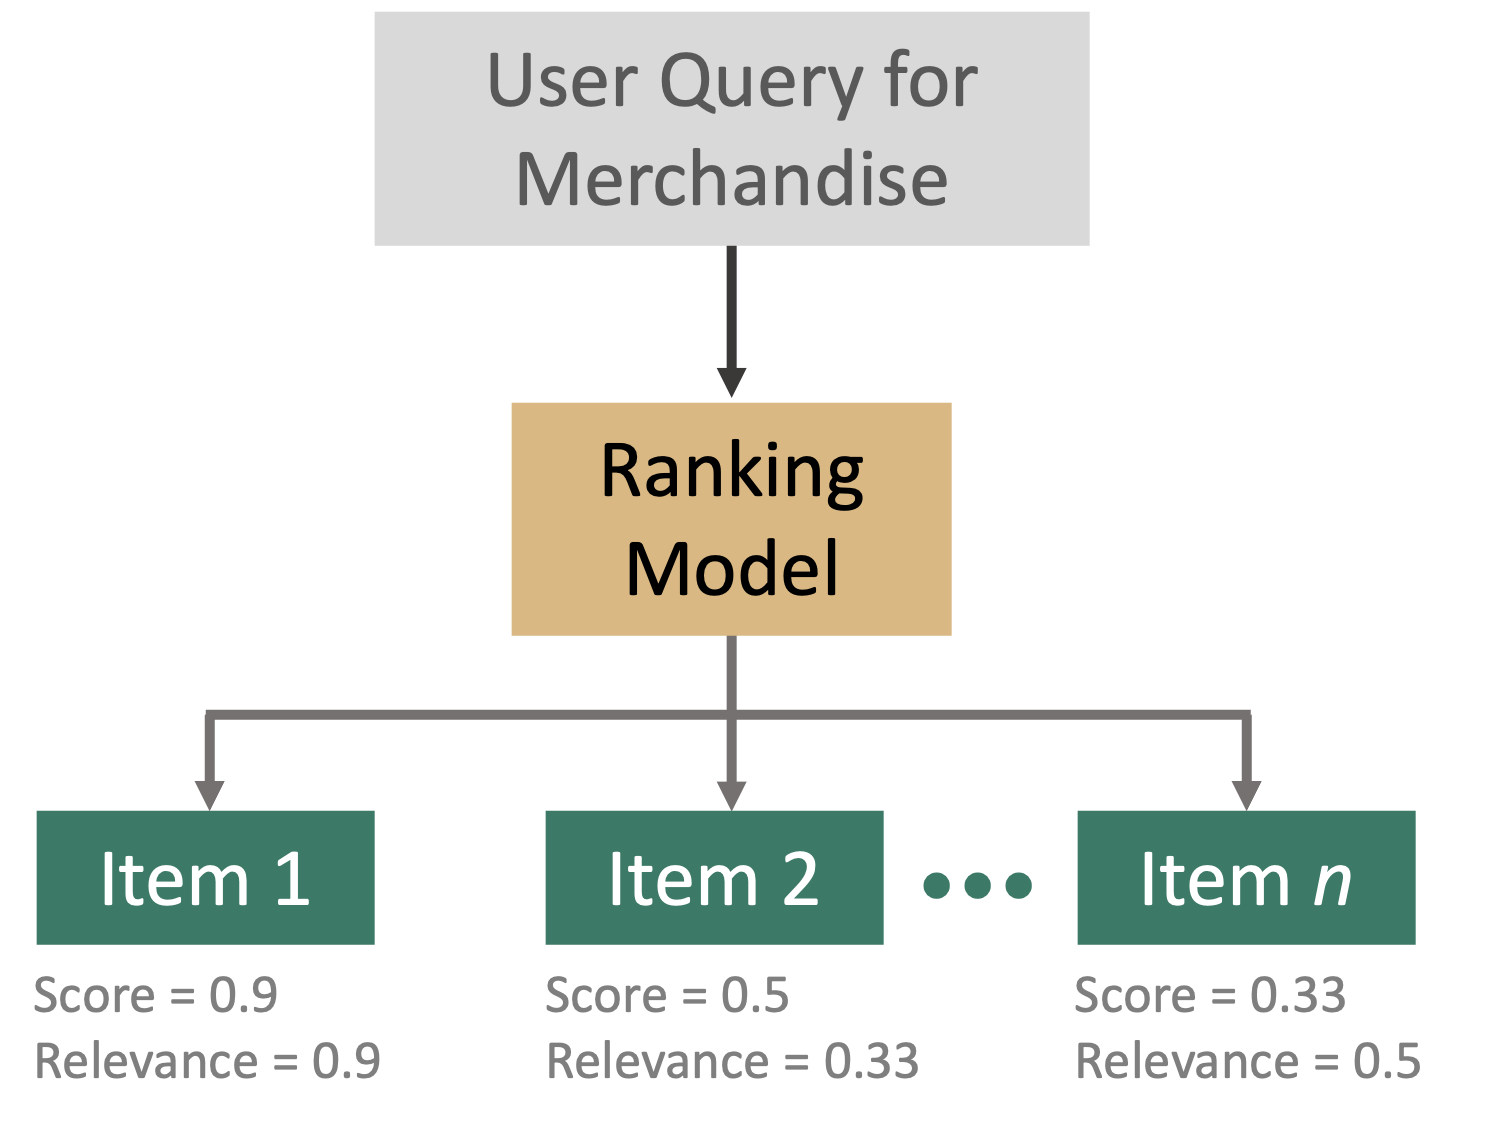
A ranking model takes a query as an input, along with other relevant information — a user’s browsing/shopping history, for example — and ranks a group of items based on their relevancy to the query.
For a ranking project in TruEra, the data is largely the same as for classification or regression projects, but with the addition of two identifiers — a Group ID and an Item ID.
Group ID is the entity for which the ranking is being undertaken. In a merchandise recommendation use case — e.g., making recommendations to a user from a variety of product categories — the Group ID would be the user id.
Item ID, by contrast, is the entity being ranked. Consequently, in a product recommendation use case, the Item ID uniquely identifies each of the products being ranked according to the model's recommendation criteria.
The primary ranking metric in TruEra Diagnostics is NDCG (for Normalized Discounted Cumulative Gain).
NDCG answers the question:
For a given Group ID, how well did my model order the items compared to an ideal ordering?
This NDCG metric requires specification of an integer value K to denote how many items per group are considered when calculating NDCG. Consequently, NDCG is often referred to as NDCG@K.
With K in mind, the original question can be rephrased as:
For a given Group ID, how well did my model order the top K predicted items compared to an ideal ordering of those same top K predicted items?