Quantitative Input Influence
Calculates the cumulative influence/impact of a group of features.Diagnostics Quickstart
To get started quickly with TruEra Diagnostics, make sure the Python SDK is installed (see Installation and Access), then follow the guidance below to learn how to use the Python SDK to upload sample data and models.
First-time users
TruEra users utilizing Python are strongly encouraged to use the Python SDK to get started. See Python SDK Tutorial: Local Compute Flow for an in-depth tutorial.
Connecting to TruEra
Connecting to the TruEra platform is a straightforward authentication process using a token. To make the connection, you'll need to provide the TRUER_URL and your TOKEN.
Replace the <TRUERA_URL> placeholder with the URL string "http://app.truera.net" in Step 4 below.
To generate your authentication token:
- Open your avatar in the Web App toolbar.
-
Click Authentication, then click GENERATE CREDENTIALS.
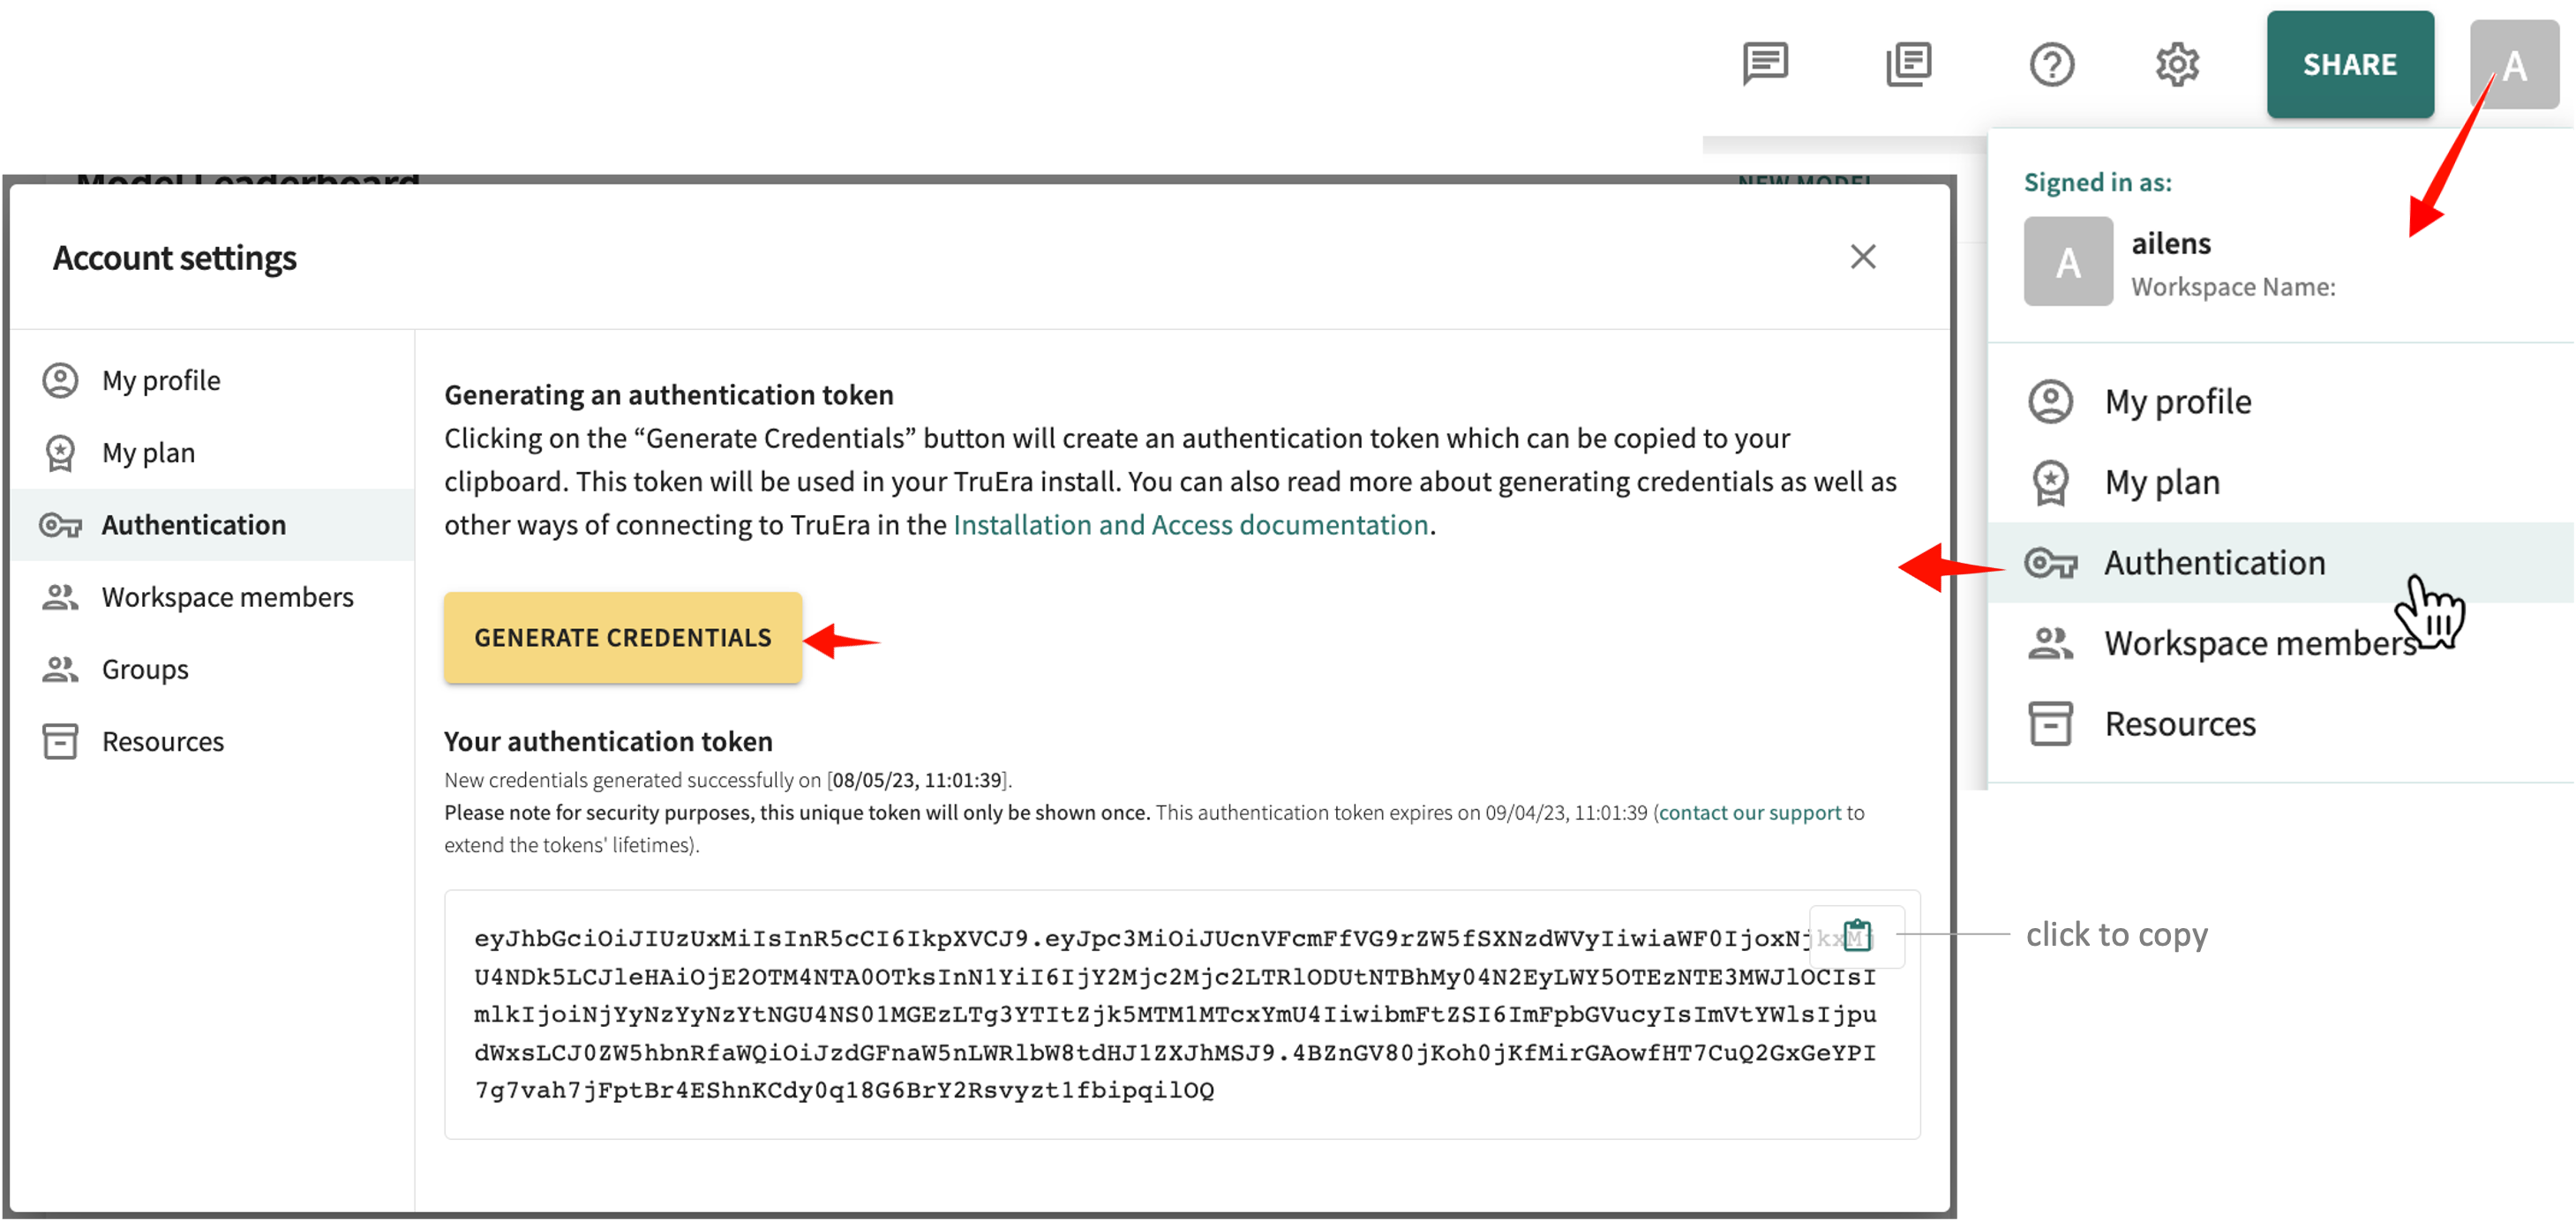
click and hold to enlarge -
Click the clipboard icon to copy the token.
-
Replace the
<TRUERA_TOKEN>placeholder shown next by pasting in the copied token.TRUERA_URL = "<TRUERA_URL>" TOKEN = "<TRUERA_TOKEN>" from truera.client.truera_workspace import TrueraWorkspace from truera.client.truera_authentication import TokenAuthentication auth = TokenAuthentication(TOKEN) tru = TrueraWorkspace(TRUERA_URL, auth)
Although the connection can be set on individual commands, you'll find it more convenient to set it once and then verify the connection, as necessary.
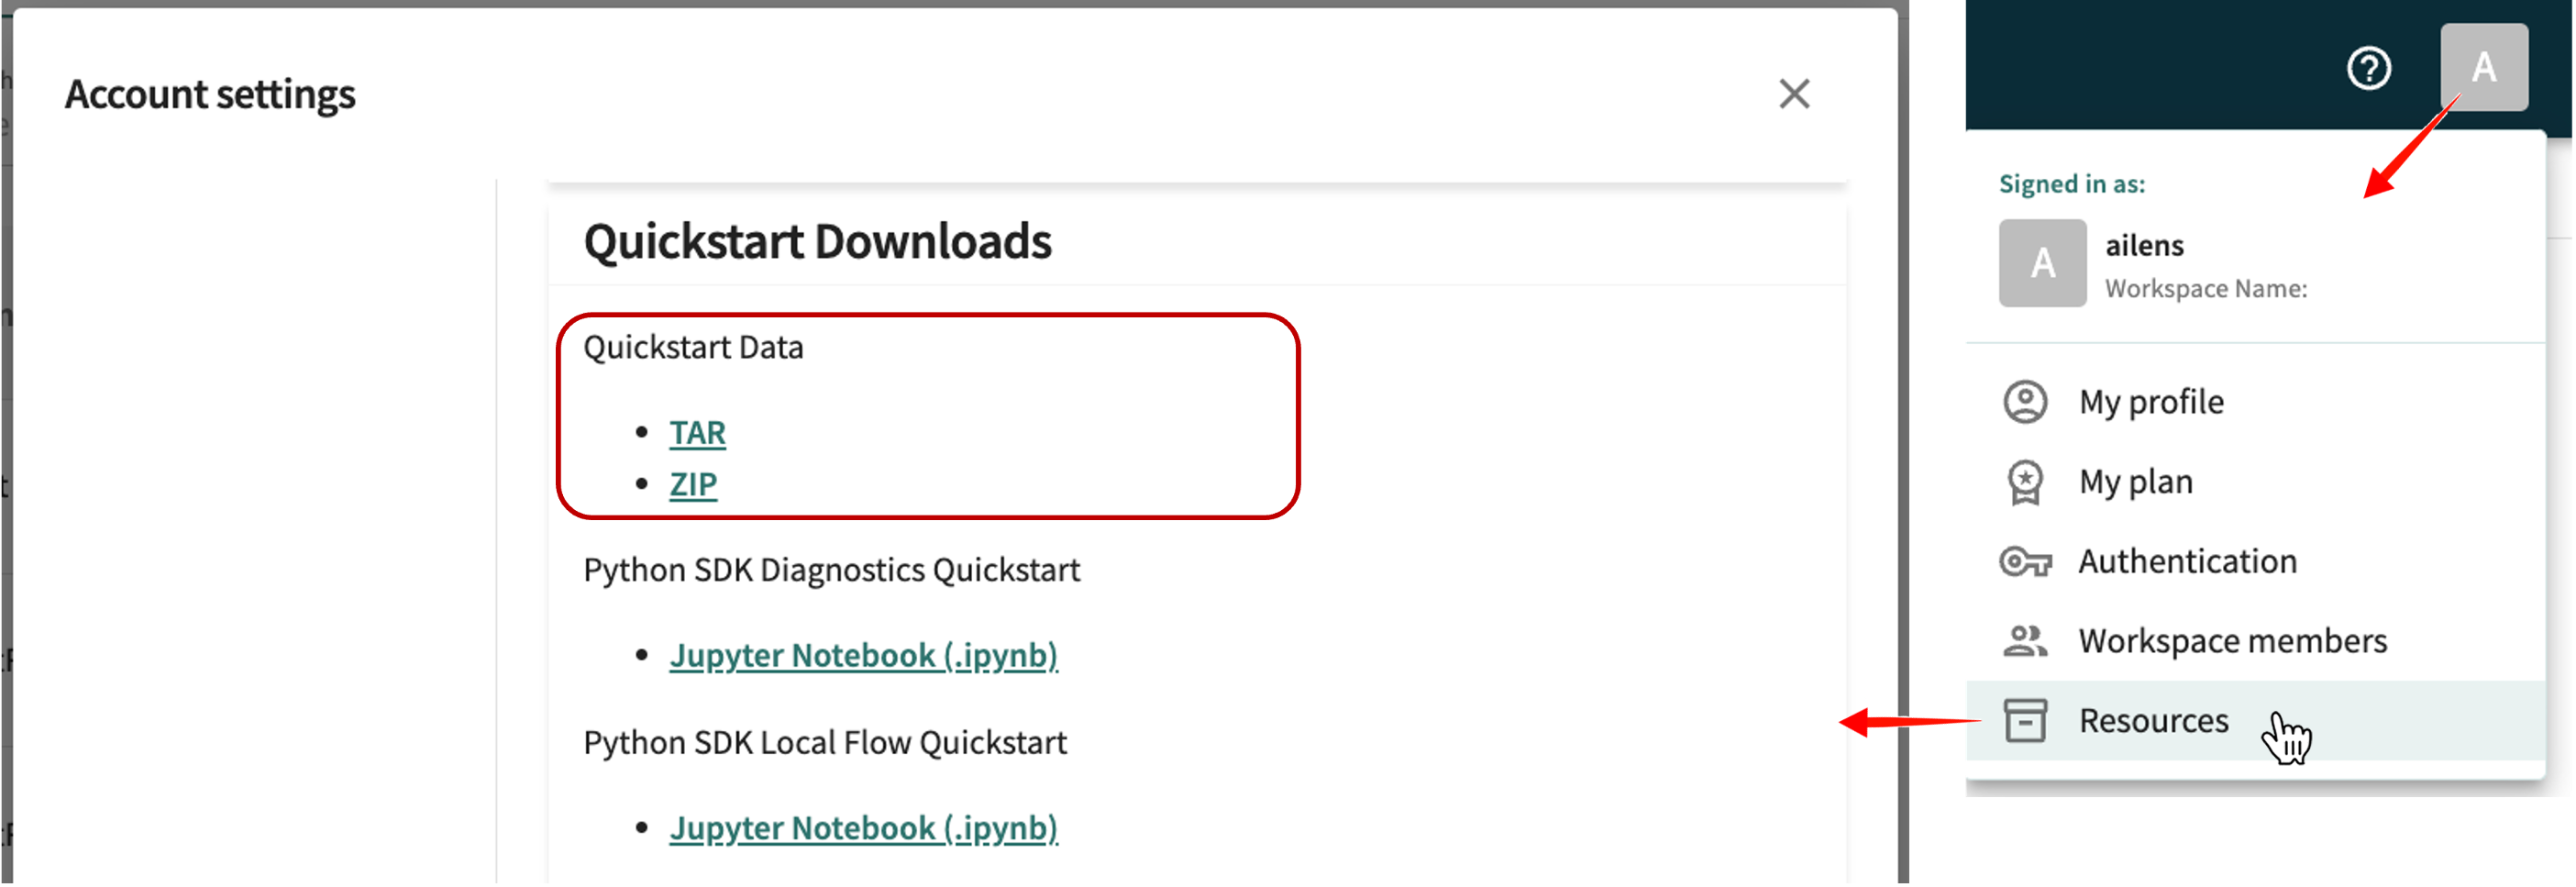
Downloading Samples
The sample data and model you'll need for this quickstart is available in the TruEra Web App on the Account settings page (pictured next).
For this quickstart, fetch the data collection from the sklearn.datasets module and pull the data into a pandas DataFrame.
    import pandas as pd
    from sklearn.datasets import fetch_california_housing

    # Fetch the data from sklearn
    dataset = fetch_california_housing()

    # Pull into DataFrame
    feature_col_names = dataset["feature_names"]
    label_col_name = dataset["target_names"][0]
    XS = dataset["data"]
    YS = dataset["target"]
    data = pd.DataFrame(data=XS, columns=feature_col_names)
    data[label_col_name] = YS
    data["id"] = range(len(data))
    import pandas as pd
    from sklearn.datasets import fetch_20newsgroups

    # Fetch the data from sklearn
    data_bunch = fetch_20newsgroups()

    # Pull into DataFrame
    df = pd.DataFrame({
        "text": data_bunch['data'],
        "label": data_bunch["target"]
    }).reset_index(names="id")
You're now ready to create a TruEra project and upload both the sample data and model.
Adding a Project with Sample Data and Model
Based on scikit-learn's California housing dataset, the California Housing project is used throughout this quickstart to illustrate the model ingestion process. For other frameworks, the process is similar. A parallel quickstart notebook with different sample projects to practice on is also available as a supplement to the guidance presented here. See also Truera's Python SDK Tutorial specifically covering Local Compute Flow.
Additional Notebooks
Additional Python notebooks can be found in TruEra's Notebook Library.
Step 1. Create a TruEra project
A TruEra project contains all model versions, datasets and metadata related to the AI/ML project. See Project Structure for a structural introduction and overview. Project names are case-sensitive and invoked many times during model iterations, so a short yet descriptive project name is recommended. Other key parameters in project creation include:
-
Score type – set to
probitsorlogitsfor classification projects; set toregressionfor regression projects. -
Input type – For tabular projects, set to
tabular. For NLP projects, set totext. Defaults totabular.
Here's the SDK call:
tru.add_project("California_Housing", score_type="regression")
tru.add_project("Covid_Tweets", score_type="classification", input_type="text")
To confirm, get the project.
tru.get_projects()
['California_Housing']
tru.get_projects()
['Covid_Tweets']
The new project is now included in the Web App's project list. Click Projects at the top of the left-side navigator to see the list.
Step 2. Add a data collection
A data collection is an organized inventory of data that can be used for a particular model. A data collection consists of individual data splits, which are slices of input features, labels, and extra metadata. All splits within a given data collection share the same schema - meaning that they all have the same column names and data types. In general, all splits within a model's data collection can be fed into the model. Broadly, a data collection contains:
- Data splits – a set of in-sample data (train, test, validate) or out-of-sample (OOS)/out-of-time (OOT) data to test model quality, stability and generalizability.
- Feature Metadata – an (optional) set of metadata defining the set of features for a set of splits and the various models trained and evaluated on them; defines the relationship between pre- and post-transform data provides feature groups and descriptions for use throughout the tool.
Note
All splits associated with a data collection are assumed to follow the same input format. As a rule of thumb, if a model can read one split in a data collection, it should be able to read all other splits in the same collection.
tru.add_data_collection("sklearn_data")
tru.add_data_collection("pytorch_data")
Step 3: Add split data to your local workspace
A split is a subset of data points used to train or evaluate a set of models. A data collection can have multiple splits added as needed from flat files, pandas DataFrames, or a variety of external data sources, like S3 blobs. For our sample project, we'll create splits from CSV files.
Note
All splits added to TruEra require point identifiers. The column containing those identifiers should be specified using id_col_name, which must be a string.
The following additional data can also be specified:
- Labels – the target variable for the model (ground truth) should definitely be specified for training and test data.
- Extra – additional feature columns that may be useful even not used by the model; for instance, to define customer or data segments for evaluating fairness.
There are also some mandatory metadata required when adding a split, including the model's split_type, which must be one of all, train, test, validate, or oot.
As a general rule of thumb:
train/test/validate– uploaded data used in model training, testing and validating stepsall– needed when train and test data are combined in a single fileoot– needed when data is from a production stream or for purposes other than model building
For more about split types, see Project Structure.
For the sample project, add data using the SDK's add_data() method. Use the ColumnSpec class from truera.client.ingestion to specify which columns are features, labels, or point ids. See Reading Data from DataFrames for more information.
Here's the syntax:
# Ingest data into Truera
from truera.client.ingestion import ColumnSpec
tru.add_data(
    data,
    data_split_name="all",
    column_spec=ColumnSpec(
        id_col_name="id",
        pre_data_col_names=feature_col_names,
        label_col_names=label_col_name
    )
)
# Ingest data into Truera
from truera.client.ingestion import NLPColumnSpec
tru.add_data(
    data=df,
    data_split_name="all",
    column_spec=NLPColumnSpec(
        id_column_name="id",
        text_column_name="text",
        label_col_name="label"
    )
)
Step 4. Add the model to your local workspace
from sklearn.ensemble import GradientBoostingRegressor

# instantiate and fit model
gb_model = GradientBoostingRegressor()
gb_model.fit(XS, YS)

# Add to TruEra workspace.
tru.add_python_model("model 1", gb_model)
# NLP only supports virtual models currently
tru.add_model("model")
When the model is ready, continue with Step 5.
Step 5. Compute and ingest predictions and feature influences
Now that we have ingested the features as well as the model, we can move on to predictions and feature influences.
You will need a method for computing influences available in your python environment. This can be TruEra
QII
or SHAP
. SHAP is already packaged with your TruEra client.SHapley Additive exPlanations
Mathematical method to explain the predictions of machine learning models based on game theory. Used to explain the predictions of any machine learning model by calculating the contribution of each feature to the prediction.Here's the syntax for computing and ingesting predictions:
# Compute predictions
predictions = pd.DataFrame({
    "predictions": gb_model.predict(XS),
    "id": data["id"]
})

# Ingest predictions
tru.add_data(
    predictions,
    data_split_name="all",
    column_spec=ColumnSpec(
        id_col_name="id",
        prediction_col_names="predictions"
    )
)
And here's the syntax for computing and ingesting feature influences:
# Set a background data split for feature influence computations
tru.set_influences_background_data_split("all")
# Compute feature influences, ingested automatically
feature_influences = tru.compute_feature_influences()
Congratulations! You’ve created a TruEra project and added your first data collection and model.
Depending on the scale of the data and the complexity of the model, further TruEra computations can take from a few minutes to a few hours. When complete, the results are displayed.
Step 6. Start your analysis
You can now use the TruEra web application to surface analytics for the model.
Click Next below to continue.