Managing Users, Groups, Workspaces, and Project and Dashboard Access
Introduction
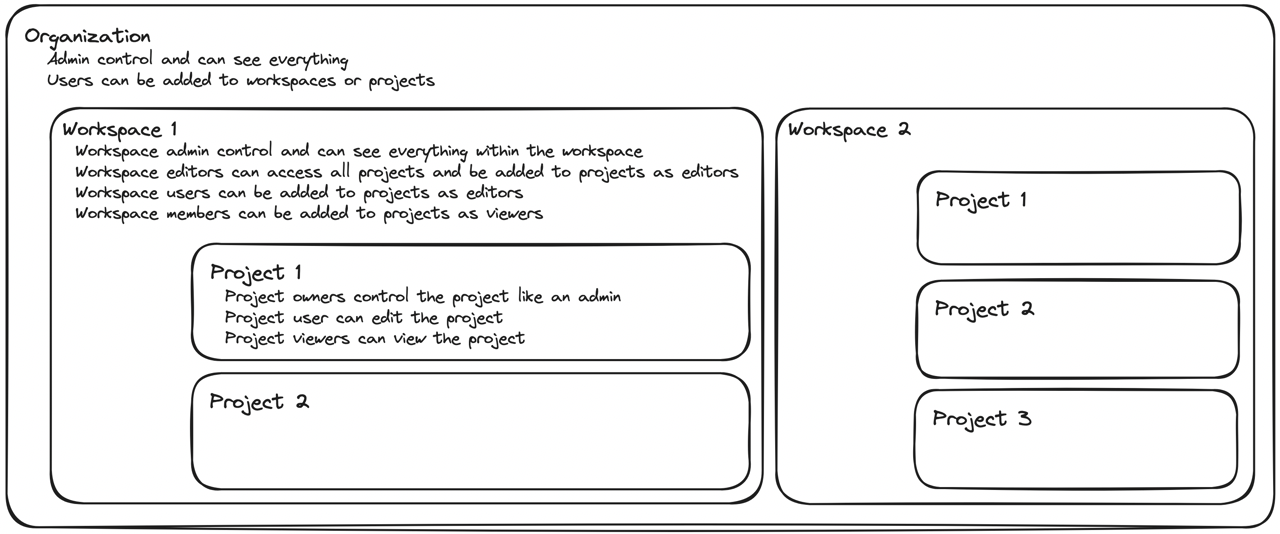
Role-based access control (RBAC) lets authorized TruEra administrators assign permissions to users based on their role within your organization.
Platform-supported roles include:
-
Organization roles
- User – granted basic edit permissions including the ability to create projects and dashboard, and invite users to the Organization (SaaS only)
-
Admin – responsible for managing user roles within a TruEra deployment,
with the authority to:
- Add a new user or group
- Add a user or group to a project
- Promote a user or group to the project owner role
- Promote a user to the admin role
- Demote an admin / remove their admin permissions
- Delete any project or dashboard
- Invite users to the Organization (SaaS only)
-
Workspace roles
- Member - read-only access to the workspace including viewing all dashboards and the ability to be added to a project as a Member
- User - ability to create projects within the workspace
- Editor - ability to create and view all projects within the workspace
- Admin - organization admin permissions within the workspace
-
Project roles
- Member - read-only access to the project
- User - access to edit the project
-
Owner - user who created the project or was promoted to owner. There can
only be one per project and they have the authority to:
- grant a member read-only or edit access to the project
- promote a project member to project owner, thereby relinquishing ownership
- remove a project member from the project
- delete the project
Definitions:
- Role: a set of permissions that control a user’s access to a specific section or action on the site.
- Group: a collection of one or more users that can be assigned workspace and project roles as a single entity. Groups can be created directly in TruEra using existing organization members or synced via an identity provider (IDP).
- Member: a user or group that has access to the organization, workspace, or project in question.
- Workspace: a collection of projects and dashboards that can be managed and metered together.
Viewing and Managing Users and Groups
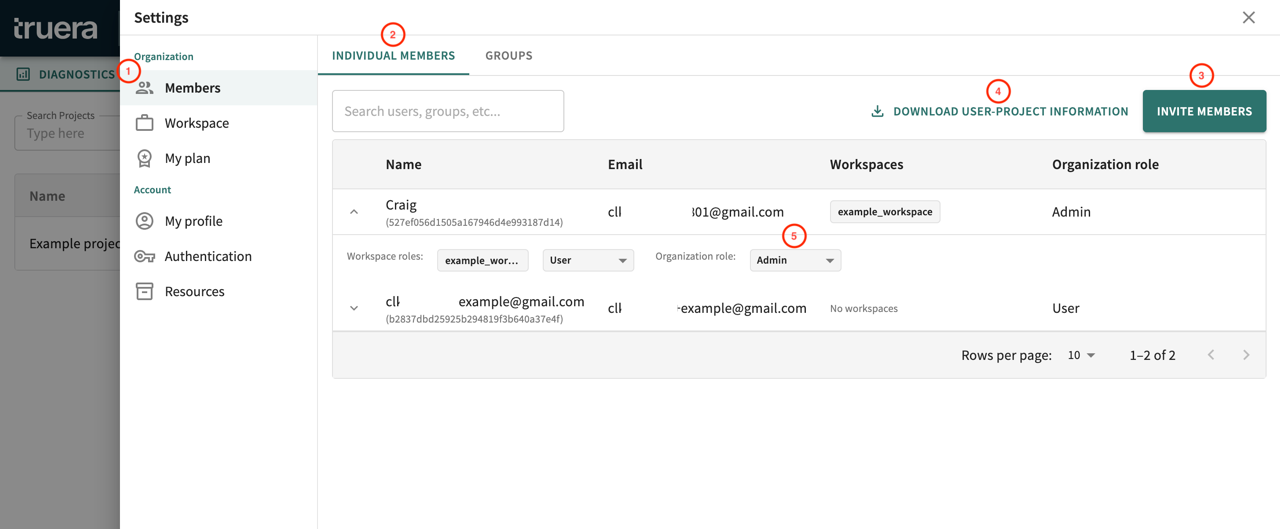
Organization members can view and manage all organization members and groups in the Members section of Settings (fig. 1.1) depending on their role. Details on how to open Settings are included below in the Managing Workspaces section of this doc. Organization members with the User role can view members here. Those with the organization or workspace Admin role can view and edit members here.
Adding a new user
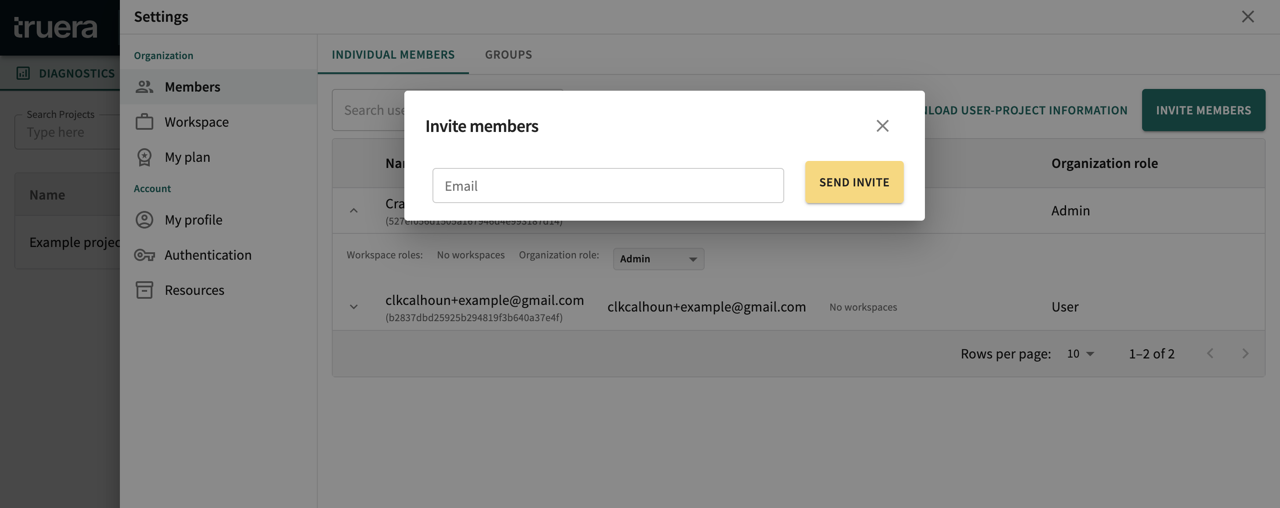
Organization admin can invite new users to their organization by clicking the Invite button (fig. 1.3) in the Individual Members tab (fig. 1.2). This opens a dialog (fig. 2) where the email of the invitee can be entered. Upon clicking Invite, the new user is created in the backend and two emails are sent to the invitee, the first contains general information on TruEra and the second contains a link to “Create a new password”. The invitee should click the link to create a new password. This will open a page where they can set their password which they can then use with the email entered in the Invite dialog to log in to TruEra at app.truera.net.
Deleting a member
Organization admin can delete members in the Individual Members tab (fig. 1.2). Every row in the table of organization Members has a Delete icon on the far right side that is displayed on hover. Clicking that icon opens a dialog confirming deletion of the member.
Managing user organization roles
Organization admin can edit member roles in the Individual Members tab (fig. 1.2). Each row in the table can be expanded to view and edit details of the member. Within this detail view is a dropdown controlling the user’s Organization Role (fig. 1.5) . The roles are described at the top of this page but as a reminder, Users can view and Admin can manage the organization details. The role is automatically saved when a new role is selected from the dropdown.
Downloading user-project information
Organization admin can download a CSV file with information about how users map to projects by clicking the Download User-Project Information button (fig. 1.4) in the Individual Members tab.
Adding a new group within TruEra
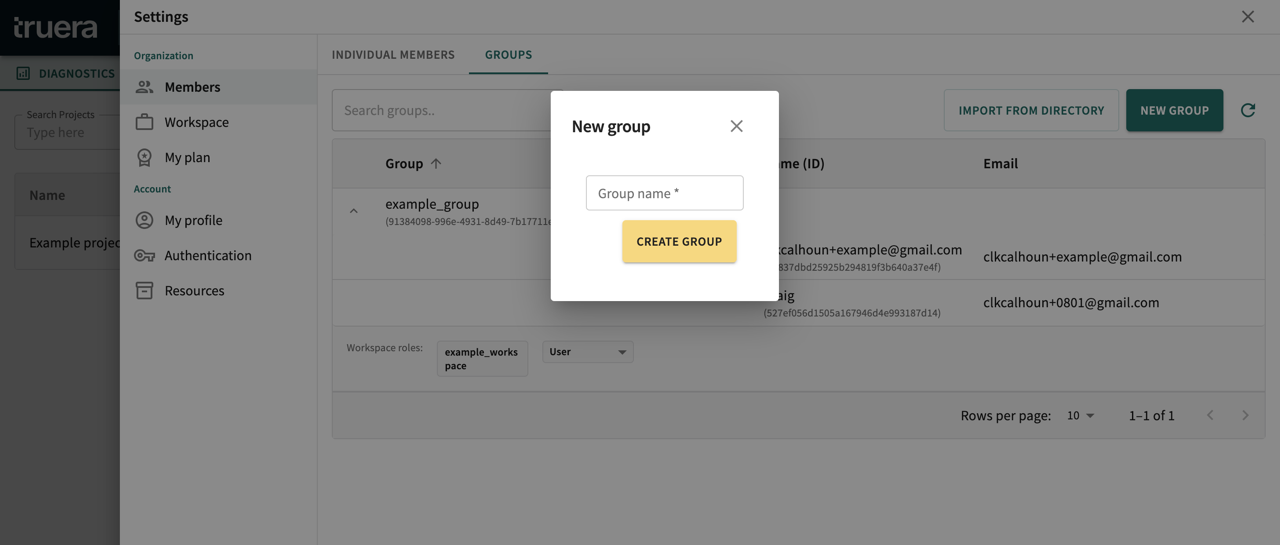
Organization admin can create a new group in the Groups tab (fig. 3.2). Clicking the New Group button (fig. 3.3) opens a dialog (fig. 4) where the name for the new group can be entered. A new group with no members will be created and added to the table of groups upon clicking the Create Group button.
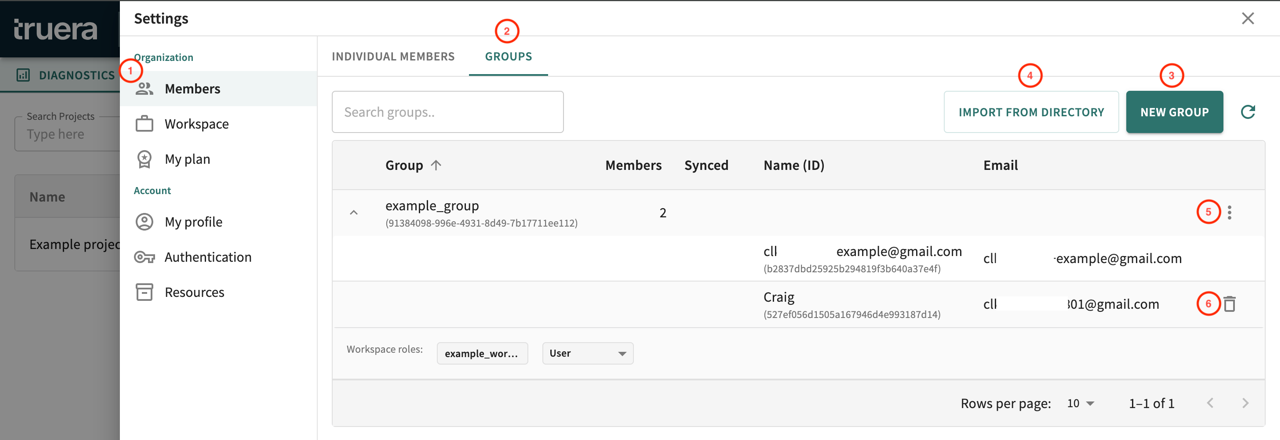
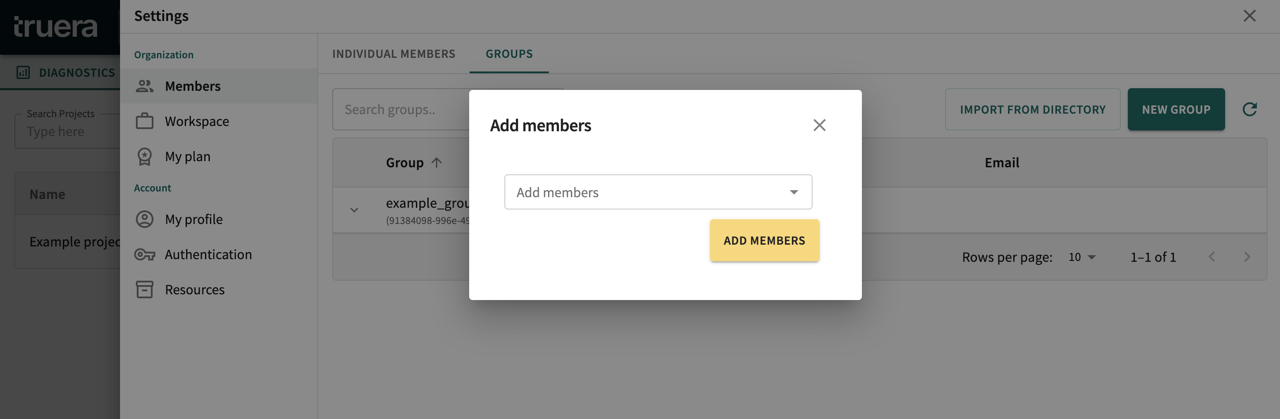
Every row in the table of groups has an options menu (fig. 3.5) displayed on the right hand side on hover that allows admin to rename, delete, or add members to the group. Clicking Add Members opens a dialog (fig. 5) containing a multi-select dropdown of organization members that are not yet members of the group. Clicking the Add Members button adds the selected members to the group. They will be displayed as sub-rows of the group within the table.
Synchronizing a group with your identity provider
To set up Group Sync initially, submit a request to TruEra to enable integration with your identity provider (IDP) for SSO and to configure the TruEra SSO app for Group Sync using SAML claims. Examples of IDPs include AzureAD, Okta, and Ping.
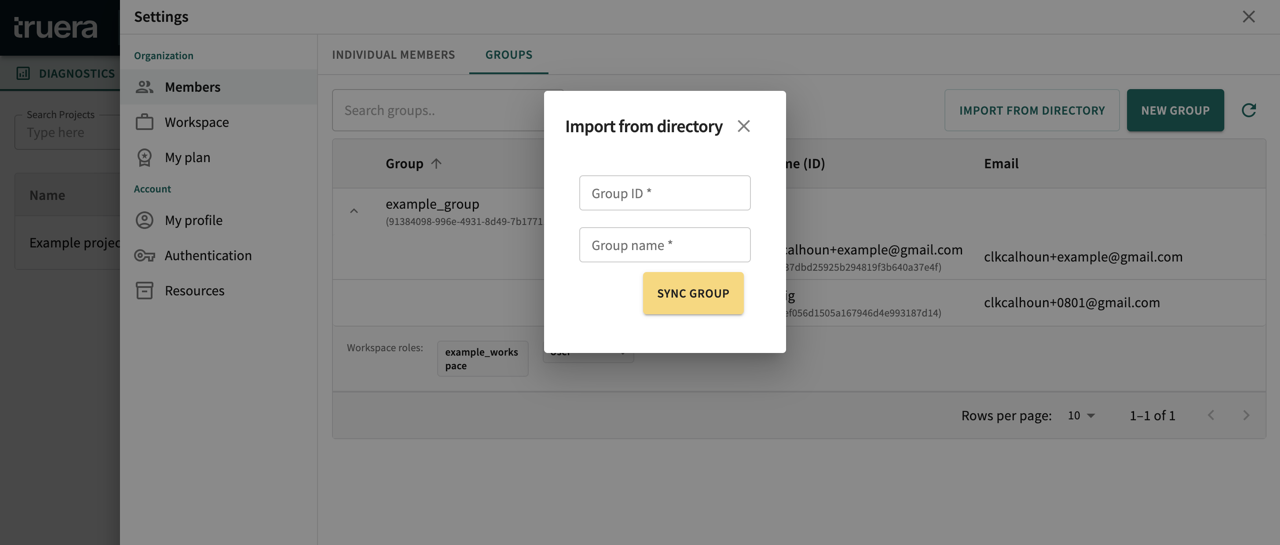
Organization admin can create a sync group from their IDP in the Groups tab. Clicking the Import From Directory button (fig. 3.4) opens a dialog (fig. 7) where the ID of the group in the IDP and the name for the new group can be entered. A new group will be added to the table of groups upon clicking the Sync Group button. The group will be populated with members as they log in to TruEra via the IDP. Members of synced groups can only be edited from the IDP so there is no option to add or remove members to synced groups.
Deleting a group
Organization admin can delete a group in the Groups tab by clicking the Delete Group option (fig. 3.6) in the group row. This will open a dialog confirming the deletion of the group.
Managing workspaces
While workspaces are not required to use the platform, they can be a great way to organize projects and dashboards for different teams or departments so that the right users can access them and usage is appropriately metered. Workspaces functionality is a paid feature; upgrade plans or contact sales for access.
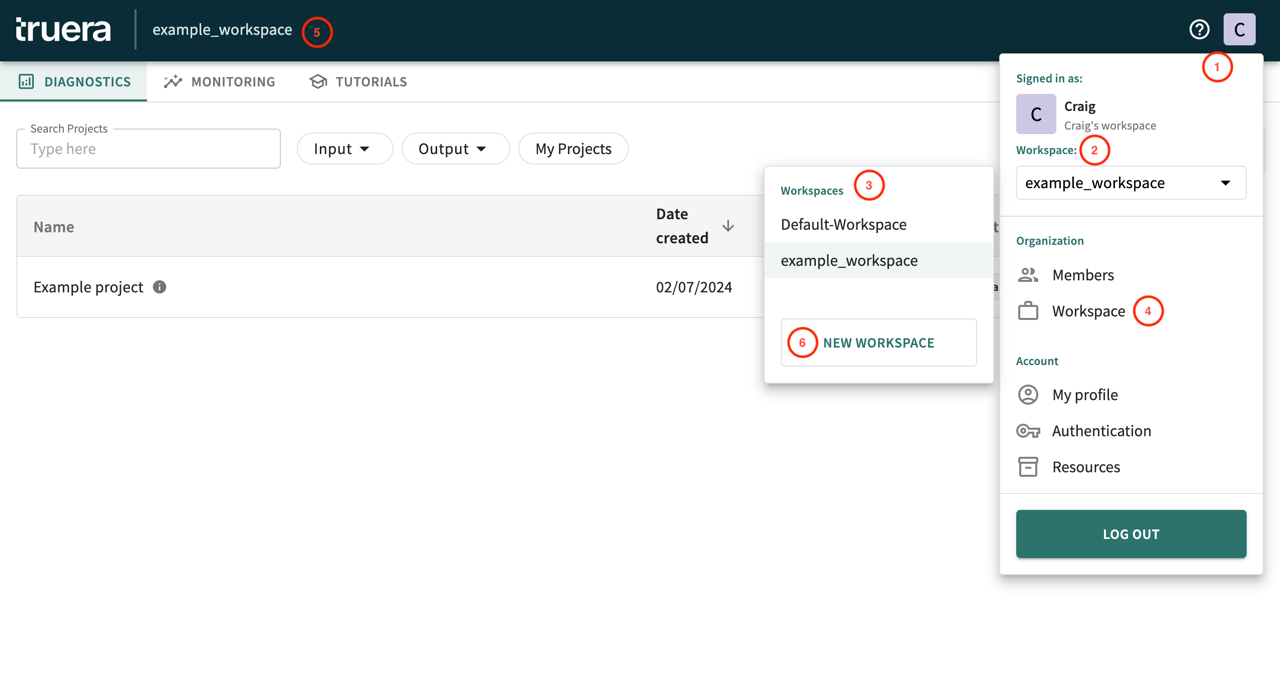
A new organization starts with an initial workspace that operates like any other workspace. The current workspace name is displayed on the home page next to the TruEra logo (fig. 7.5).
View existing workspaces
In order to view existing workspaces click the avatar on the upper right of the screen (fig. 7.1). Within the dropdown that appears is an input displaying the current workspace name (fig. 7.2). If that input is clicked, a dropdown (fig. 7.3) will appear that displays all of the workspaces that the current user has access to (an organization admin will be able to see all of the workspaces). Clicking a different workspace will switch to that workspace and, in the case that the current page is not the homepage, navigate to the homepage.
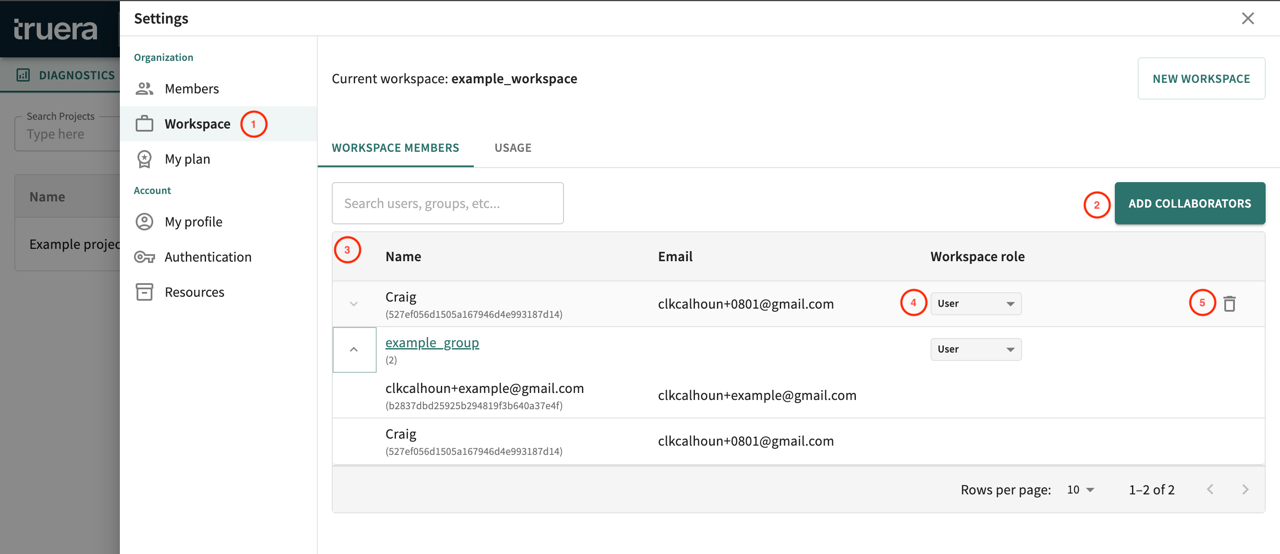
Details on existing workspaces can be viewed in the Workspace section of Settings which can be opened by clicking Workspace in the avatar menu (fig. 7.4). This section is where users can view workspace members and their roles. Workspace and organization admins can edit member roles, add new members, and view workspace usage.
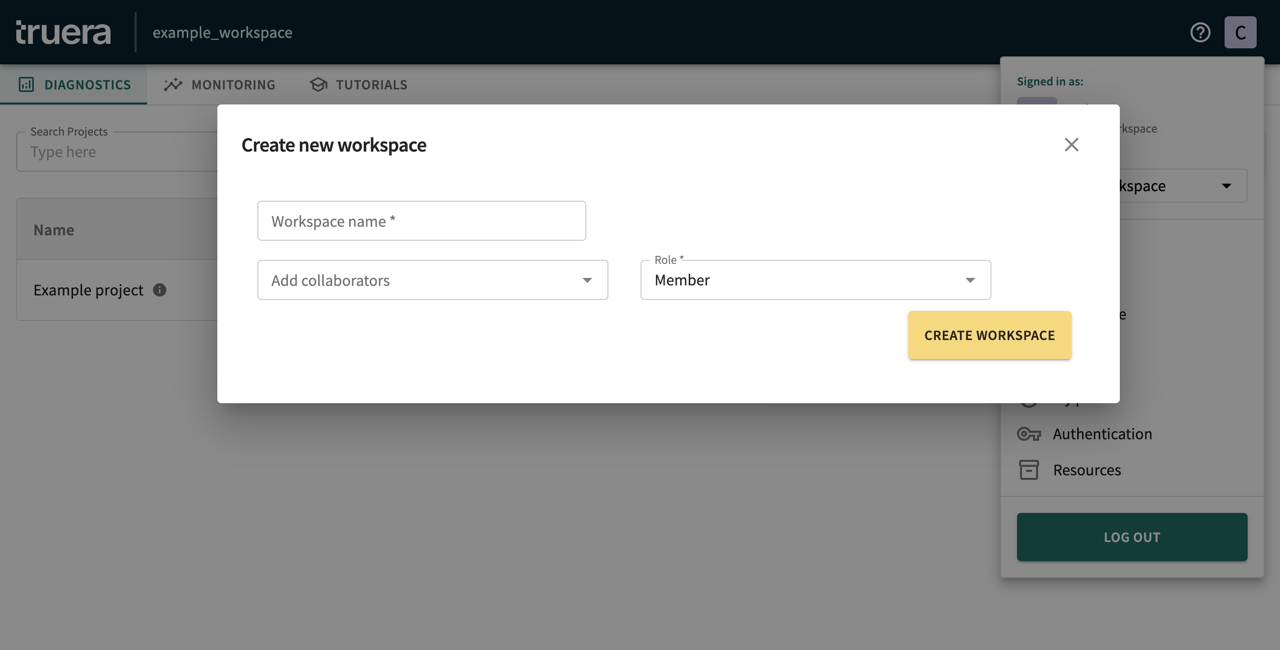
Creating a new workspace
Organization admin can create new workspaces by clicking the “New Workspace” button (fig. 7.6) within the dropdown of all workspaces. This opens a dialog where a name can be entered and members can be selected from a dropdown of existing organization members and assigned a workspace role. The flow to create a workspace can also be accessed by clicking the New Workspace button in the Workspace section of Settings.
Adding a user or group to a workspace
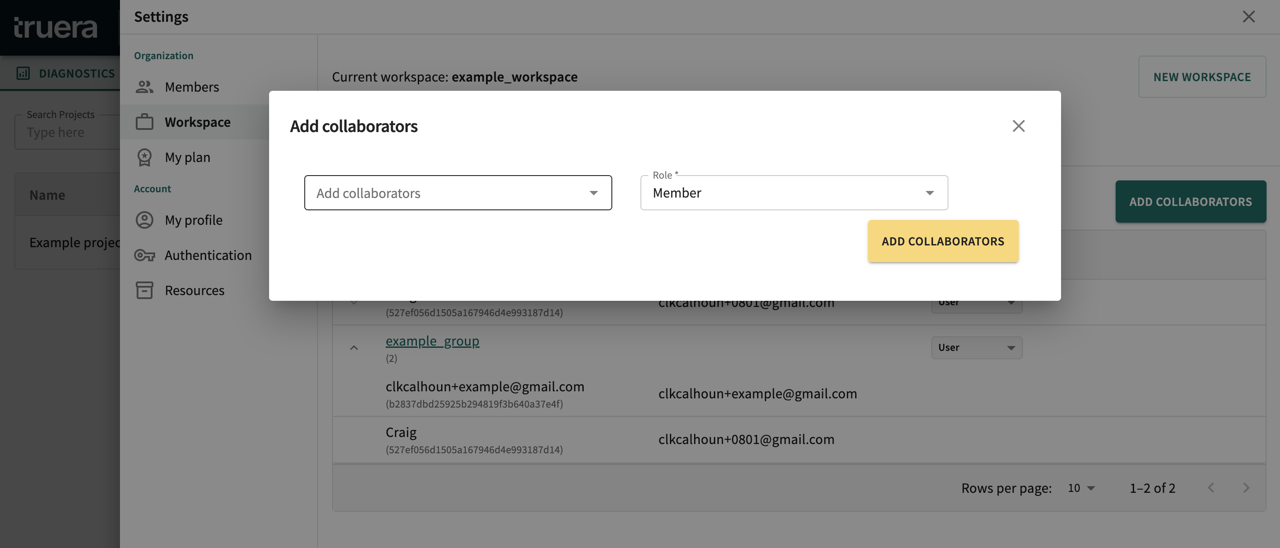
Organization and workspace admins can add users or groups to an existing workspace in the Workspace section of Settings (fig. 9.1). Clicking Add Collaborators (fig. 9.2) opens a dialog (fig. 10) where members can be selected from a dropdown of existing organization members and assigned a workspace role. These members will be shown in the table of members (fig. 9.3) upon successful addition.
Managing workspace roles
Organization and workspace admins can manage the roles of any member of a workspace in the Workspace section of Settings (fig. 9.1). The roles are described at the top of this page but as a reminder, Members can view the workspace, Users can create projects and dashboards in the workspace, Editors can create projects and dashboards and view all projects in the workspace, and Admin can manage the workspace. The role is automatically saved when a new role is selected from the dropdown (fig. 9.4).
Removing a user or group from a workspace
Organization and workspace admins can remove members from a workspace in the Workspace section of Settings. Clicking the Delete icon (fig. 9.5) which is displayed on hover will immediately remove the member from the workspace.
Managing Project Access
Project members have access to a specific project, either as the Owner, a User, or a Viewer. The roles are defined above but as a reminder the project Owner can manage project members including promoting a different project member to Owner, thereby relinquishing ownership, or delete the project entirely.
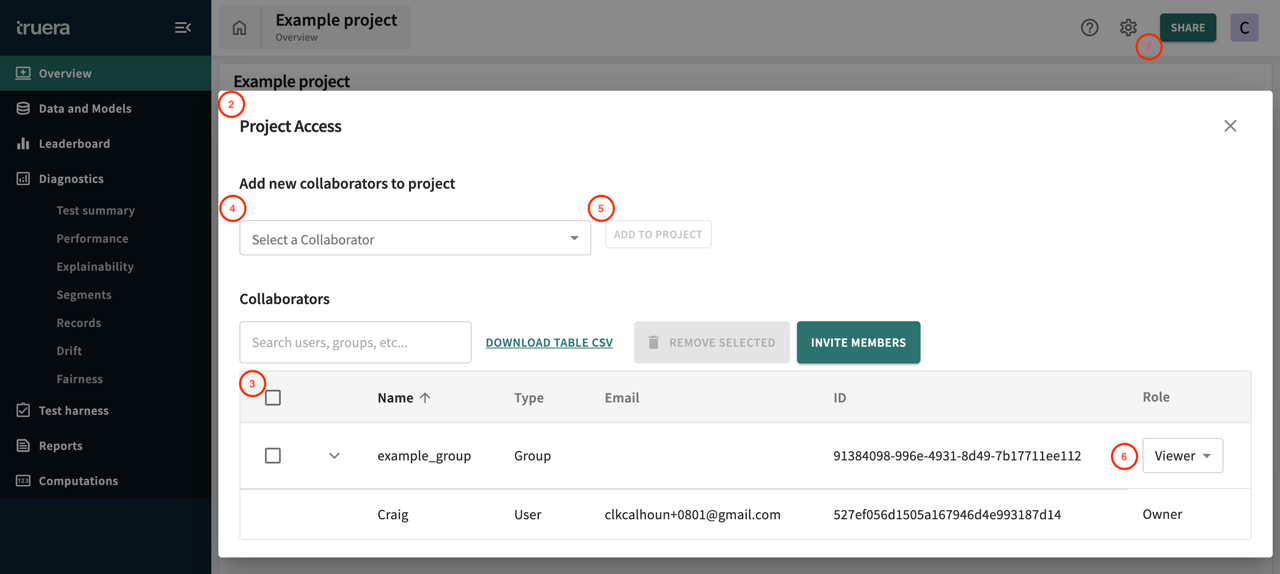
To manage or view which members have access to a project either click the Share button (fig. 11.1) on the upper right of any project page or click Manage Users from within the option menu on the far right of the project’s row on the home page. This will open a dialog (fig. 11.2) with a table of members (fig. 11.3) and controls to manage access. Organization admin, workspace admin, and the project owner have permissions to edit the members of the project and their role.
Adding a user or group to a project
Within the Share dialog, select a member from the Invite Members dropdown (fig. 11.4) which is populated with organization members that are not yet part of the project. Clicking the Invite button (fig. 11.5) will add the selected member to the project as a Viewer.
Managing a user or group project role
Within the table of project members is a role column. For project viewers and users this column displays the role of the user in the row. For organization admin, workspace admin, and the project owner this column contains a dropdown (fig. 11.6) where the current selected option is the user’s current role. Selecting a different role will immediately change the role of that user.
Removing a user or group from a project
Project members can be removed by selecting the checkbox on the left of the row then clicking Remove Selected. This will immediately remove the selected members from the project.
Managing Dashboard Access
Dashboards are visible to any member of the workspace that the dashboard belongs to. Dashboards use data from one or more projects so dashboard data is only accessible if the user has access to the project.